

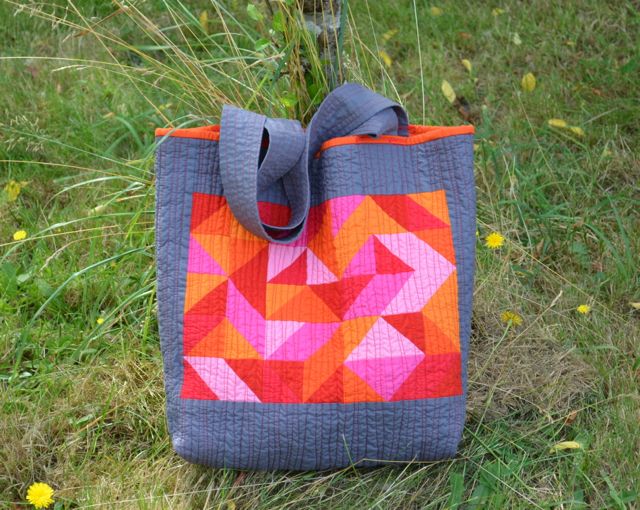
Today it is my turn to share a tutorial with you. Whenever I take out one of my Modern Shopping Bags, people comment on it. I was surprised how many people took pictures of it at Quilt Con.
My tutorial was first written for Cindy at Fluffy Sheep Quilting (who is also a FAL sponsor) and she provided me with fabric and published the tutorial in her September 2012 newsletter. So I know it is not quite in keeping with the rules to run a previously published tutorial here, but I did plan to run it on my blog one day, it originally ran almost a year ago, and it is a tutorial for a bag, but also a tutorial for every step of making a quilt. Oh, and I get to break the rules sometimes. I hope you like it, despite the need to get several cups of tea to make it, finally, to the end.
And, one day when I am less tired I will come back and fix the wonky spacing, which is what you get when you just copy a google doc into Blogger, but for now I am hoping you will be distracted by the pretty pictures and forgive the rest.


Don't forget to link up your Q2 finishes - the Q2 post-quarter link is open and it will close at midnight MST, July 7, 2013. And if you still have some UFOs I hope you will join us for Q3 of the FAL, Q3 FAL lists can be posted starting on July 8.
My tutorial was first written for Cindy at Fluffy Sheep Quilting (who is also a FAL sponsor) and she provided me with fabric and published the tutorial in her September 2012 newsletter. So I know it is not quite in keeping with the rules to run a previously published tutorial here, but I did plan to run it on my blog one day, it originally ran almost a year ago, and it is a tutorial for a bag, but also a tutorial for every step of making a quilt. Oh, and I get to break the rules sometimes. I hope you like it, despite the need to get several cups of tea to make it, finally, to the end.
And, one day when I am less tired I will come back and fix the wonky spacing, which is what you get when you just copy a google doc into Blogger, but for now I am hoping you will be distracted by the pretty pictures and forgive the rest.
Modern Shopping Bag
This tutorial was originally is part of the Fluffy Sheep Quilting newsletter tutorial series and was published in Cindy's September 2012 Newsletter. You can also read it on Google Drive here.
Introduction
This tutorial sets out the steps to make a Modern Shopping Bag. This bag has the following features:
- It is a basic bag pattern.
- It is sturdy and strong enough to carry groceries, books or whatever you please.
- It is designed to allow for quilting.
- It is very simple to customize.
By the time you finish this bag, you will have also learned and practiced all the steps in making a quilt - piecing, sandwiching, basting, quilting and binding.
Materials
One (1) fat eighth set of 8 solids or bunch of scraps for the coloured panels. I used the Under the Palm Tree bundle from Fluffy Sheep Quilting. If you are picking solids, my suggestion is to use about 6 - 8 different shades that have differing values and a fat quarter or fat eighth of each will be enough fabric. I also suggest that you not add too many different colours into the mix but having one or two colours that will stand out, such as the lime green in my bundle, will add interest. This pattern works really well with solids but would also be interesting with a thoughtfully selected group of prints.
One (1) piece of fabric that is at least 8” x 42” or WOF (width of fabric, which is about 42” on standard quilting cotton) for the two handles. If you want longer handles you will need a second piece of fabric the same size or you can add a bit of length to this piece. I used one of the medium blues for my handles.
One (1) piece of grey or other neutral fabric to frame the coloured panels. I used Kona Coal. This piece needs to be at least 23” x 40” or WOF.
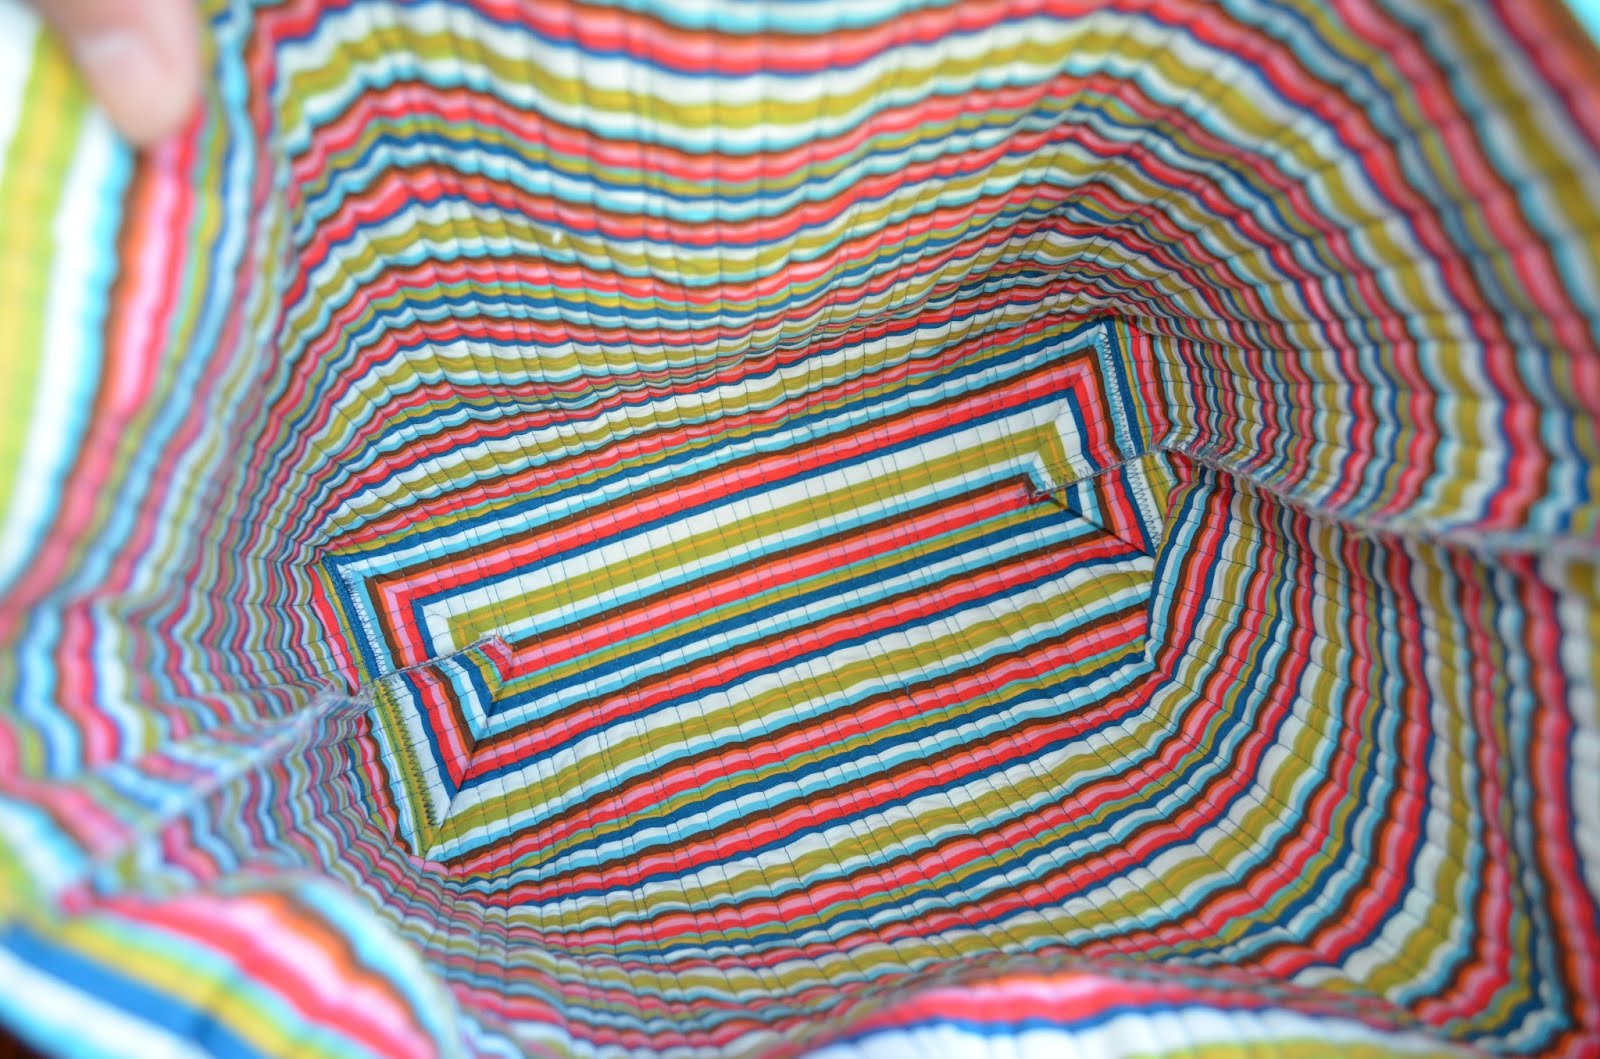
One (1) piece of fabric that is at least 23” x 42” or WOF for the lining. I used Soul Garden Stripes from Fluffy Sheep Quilting.
One (1) piece of batting or wadding that is at least 23” x 42”. Use a leftover piece from another project. If you are buying new, look for a fairly thin batting/wadding. Any fibre content will work - I used 100% cotton.
Instructions
Read all the instructions first and take a good look at the photographs. I often modify patterns to use my favourite method for various steps and you should certainly feel free to do that with this bag. However, to avoid ripping out parts, I have found that it is best to fully understand all the construction steps before I begin.
1. Piecing
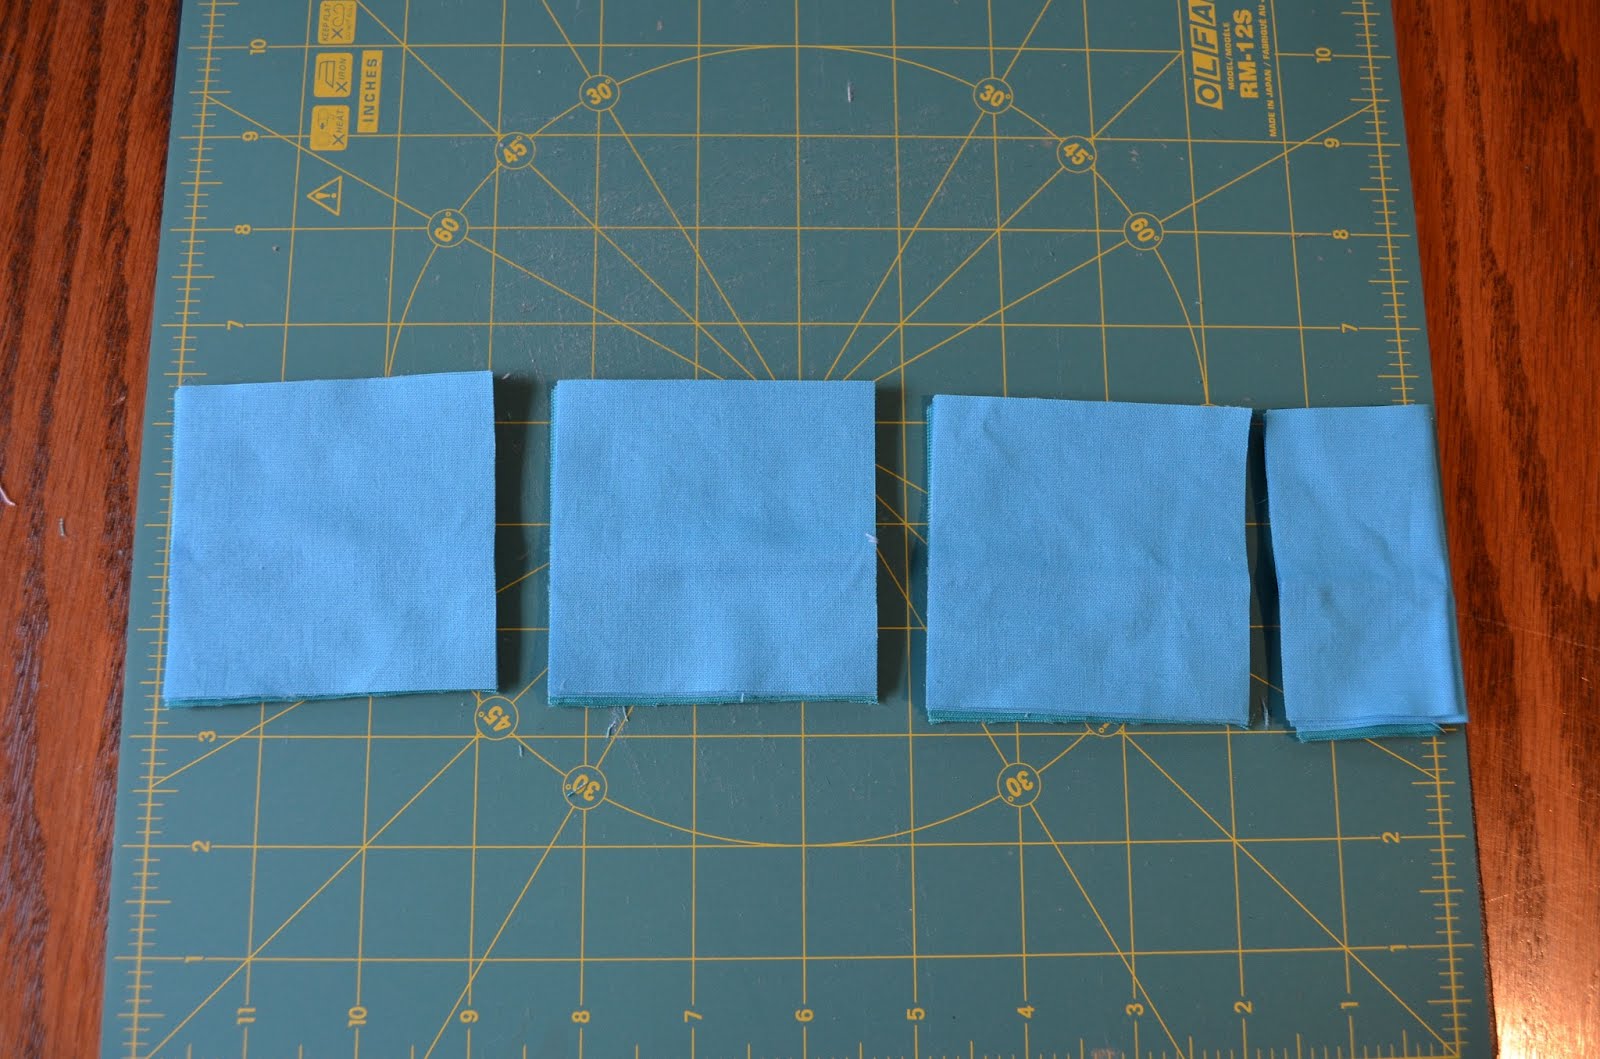
Cut 2 strips that are 3” wide along the long side from each of the coloured solid fat eighths.
Cut the strips into 3” squares. You will need at least 84 of the 3” squares in an assortment of colours. Keep those little bits left at the top, we will use them to finish the handles at the end.
Split the colours into two piles of about equal numbers of each colour and use one pile for the front and one for the back. I worked on the panels one by one so that I kept the colour balance about the same for each side.You will need 21 pairs for each side.
Pair the squares up so that there are a variety of colours and values in all the pairs. I tried to make sure that there were very few pairs that were the same. Don’t worry about pairs that seem less appealing, the design will work out.
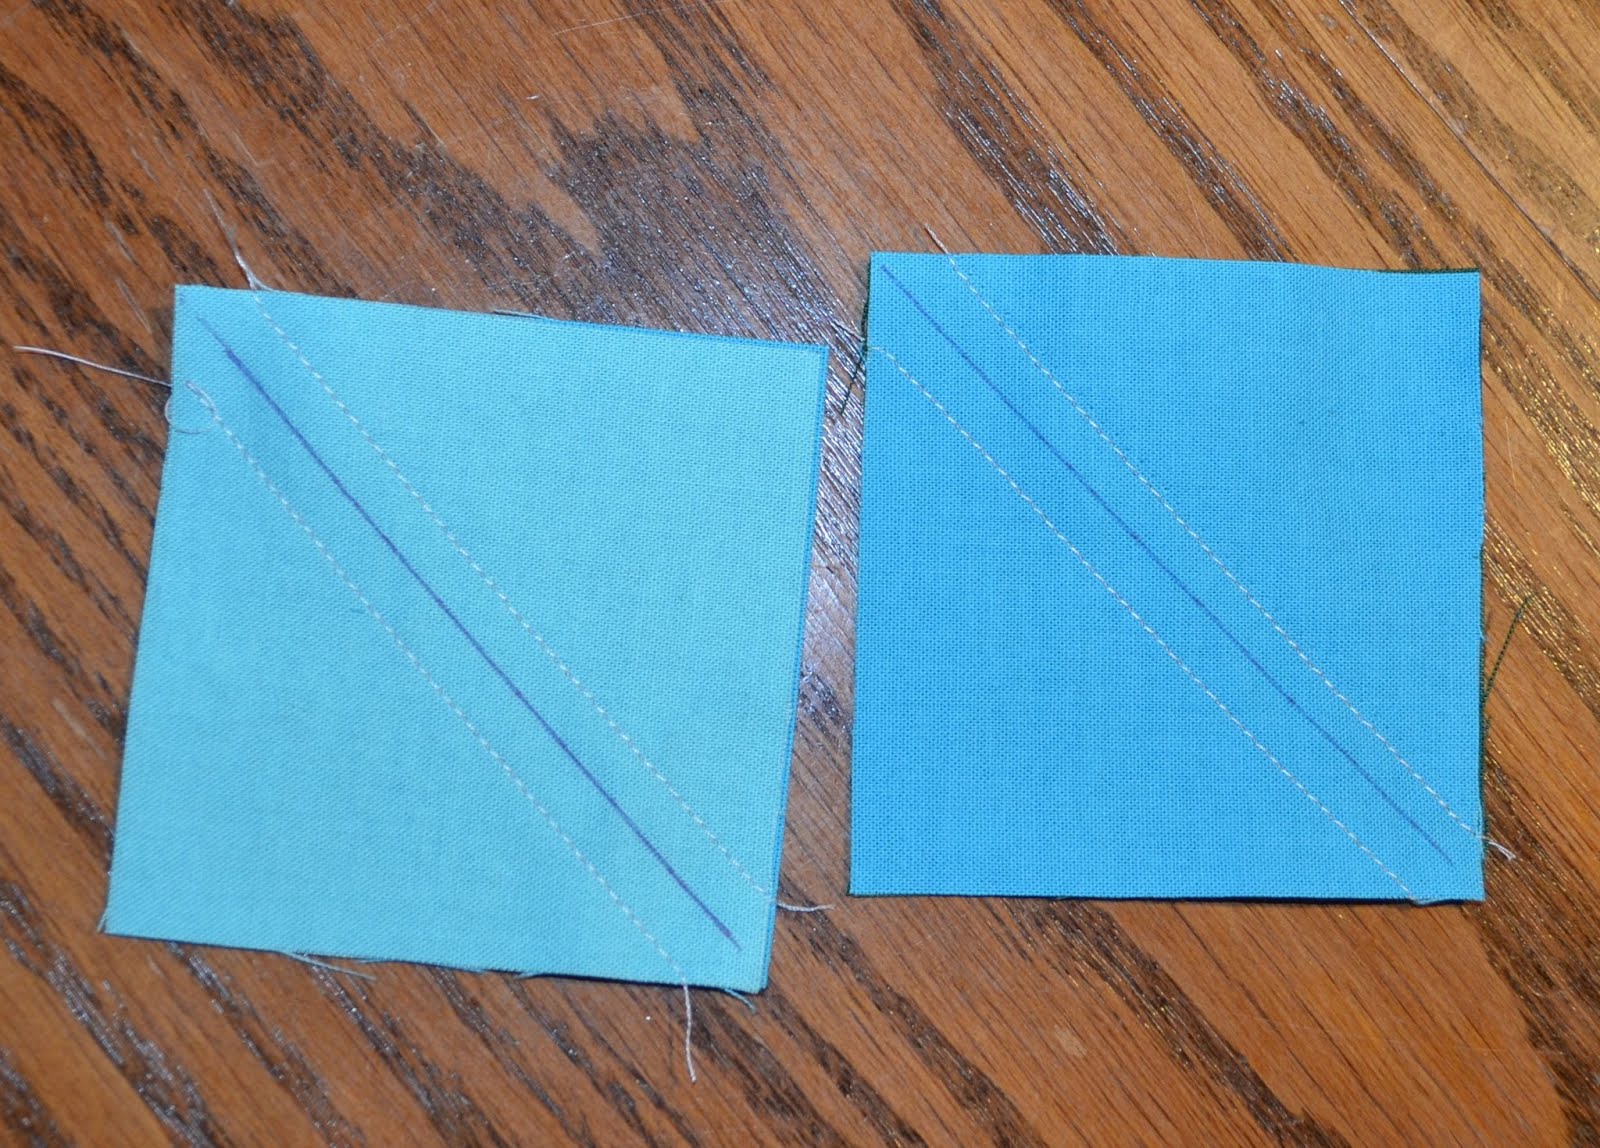
Make half square triangles out of the pairs. Place two squares right sides together. Please note that with solids there is no right or wrong side but I identify the sides for other fabric choices. Draw a line on the wrong side of one of the fabric squares from one corner of the square to the opposite corner with a marker or pencil – I used a heat sensitive pen.
Stitch ¼” on either side of the line. You can stack the pairs up and then chain piece them to stitch all pairs on one side of the line and then chain piece again to stitch on the other side of the line. The picture above shows the squares after both sides of the line have been stitched.
Cut each square along the drawn line, using either your scissors or your rotary cutter.
Press the new half square triangle (HST) square open. I press the seams open to reduce bulk when joining them.
Trim each HST square to 2.5”. Make sure that when you trim them you have the seam line lined up with the diagonal of a 2.5” square on your ruler. The trimming is tedious but it will make a huge difference in the finished project if you have the squares all the same size before you start stitching them together.
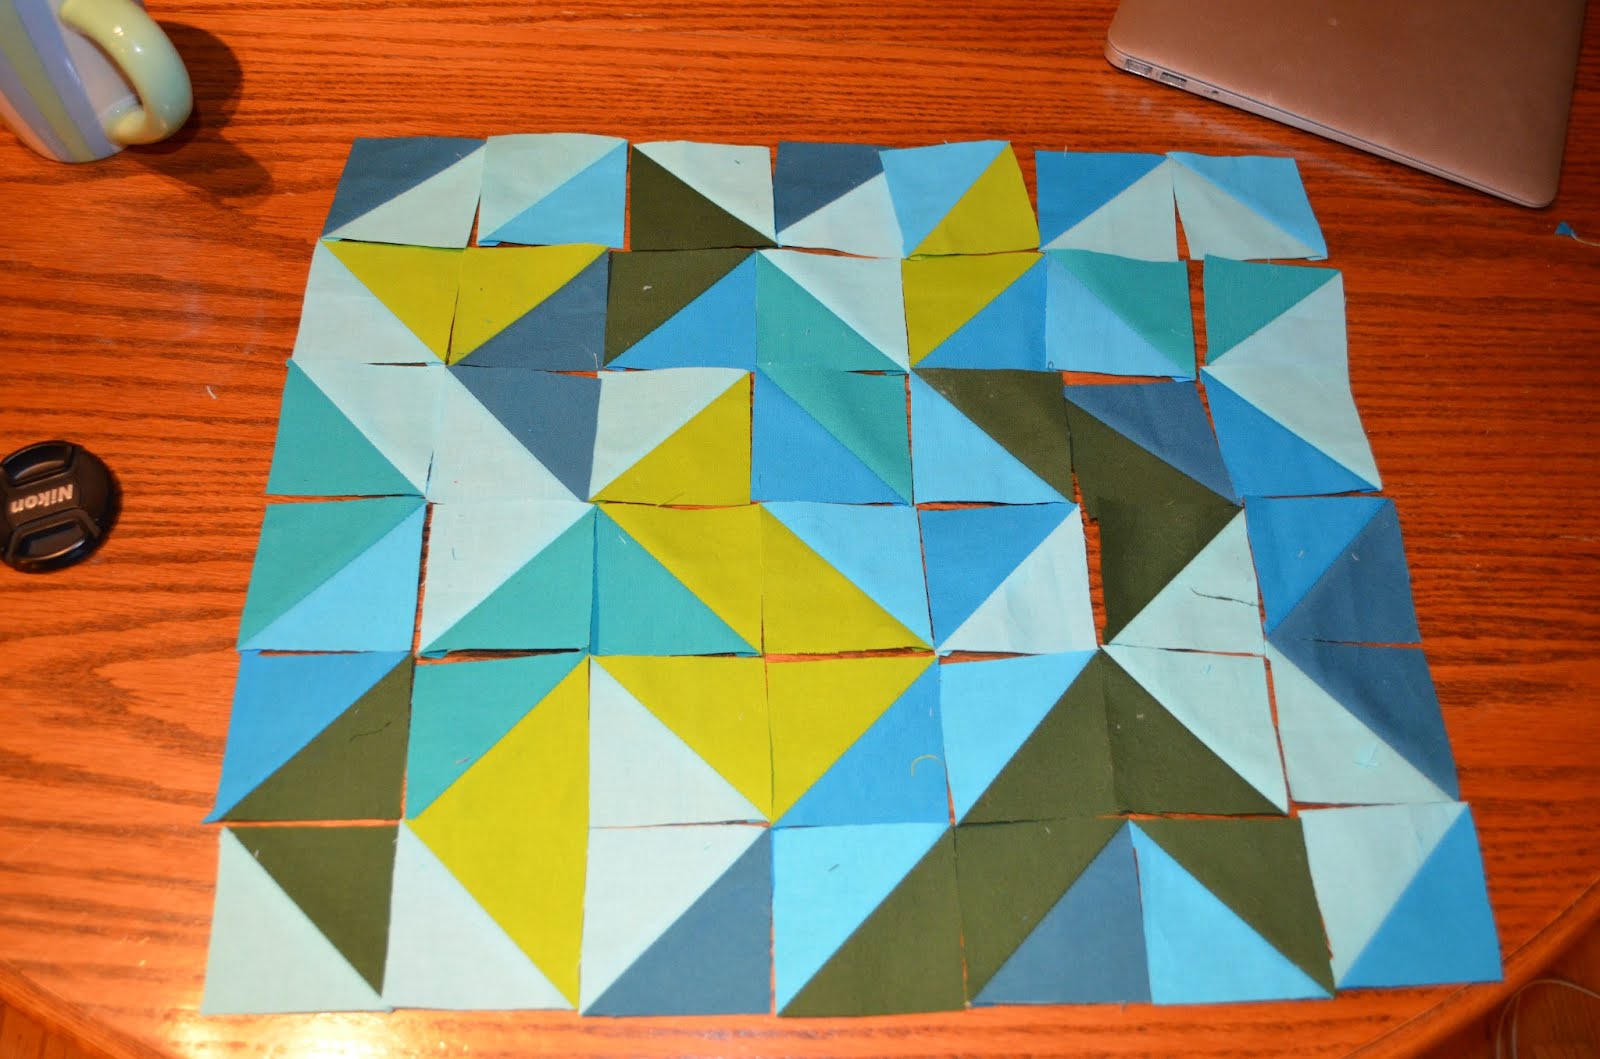
Arrange the squares in a random manner, 7 squares wide and 6 squares high.
This is the trickiest part of this bag, as many people assume that there is some plan or trick to placing the triangles. The truth is that they need to be mostly random. Lay them out as them come to you from the pile you made while pressing, remembering to vary the direction of the diagonal line. Go ahead and move them around a bit until they give you a pleasing composition but try not to overthink it or create repeating patterns. With these colours I tried to make sure that the bright acid green was adjacent to itself some of the time as that created bigger patterns with this eye catching colour. As you move the squares around, remember that when you sew these squares together the image will tighten up. If you find that you suddenly have a nice orderly arrangement, mess them all up and start over.
Don’t worry that you are not “getting” it or that it will look a mess. You are creating a pixelated type look of bits of colour where the changes in colour and value together with the odd bit of matching adjacent triangles to give it interest, movement and depth. Don’t fuss about the colour that you don’t really like either - in my case I really did not like that dark earthy green at this stage. Remember that in the end that colour will add interest to the pattern. I tried to hold myself to no more than 5 minutes to lay the squares out and move them around, thus limiting the order that I was able to impose on the original randomness. You can take a look at some of the following photographs to see how I ended up arranging these blocks.
Sew the coloured squares together into a panel. First sew each row together and then press the seams in one direction for row 1, the opposite direction for row 2, etc. Sew the rows together by matching the seam lines for the squares. I pin at each seam line and then sew the row together and then add the next row so that I can keep them in order. Press the seams in your preferred manner. If need be, trim the colourful unit into a rectangle.
Make a second colourful panel.
You can customize this bag by making any kind of feature block in this space. If you want the bag to be the same size as this one, then make that feature block 12.5” x 14.5” unfinished.
Cut two pieces from your neutral solid that are 3.5” x 14.5” Cut a third piece from the neutral that is 8.5” x 14.5”. Sew one of the 3.5” inch wide pieces to the top end of one of the coloured panels, then add the 8.5” x 14. 5” piece to the bottom end. Next, sew on the second coloured panel with its bottom joining onto the 8.5” piece, then finish with the last 3.5” x 14.5” piece being sewn to the top of the coloured panel. Be careful to make sure that both panels are facing the right way up – the top of each panel should be sewn to the 3.5” wide neutral pieces. The finished block should be about 14.5” wide x 38” long at this point.
Cut two more pieces from the neutral solid that are 3” x 38” and add one to each side of the large block. You will see a picture this final step in the next couple of photographs. Press well.
2. Sandwiching and Basting
Now you layer your fabrics just as you would a quilt. Press your lining fabric. Place the backing/lining piece with right side facing down towards the table or floor. It should be bigger than the panel of colours and neutrals that you have made. Then smooth the piece of batting/wadding on top of the back and trim it to be about the same size as the back fabric. Smooth it again to take out any bubbles. Place the front panel of colours and neutrals on the wadding/batting with right side facing up. Centre the coloured block on the batting/wadding and smooth in place. Baste the three layers together in the same way you would baste a quilt, using your favourite method - I used pins placed about 6” apart.
3. Quilting
Now it is time to quilt the bag. This is another opportunity to customize the bag and have some fun. I picked a darker blue Aurafil 40 weight thread from Fluffy Sheep Quilting for the quilting. You could use many other colours or kinds of thread for the quilting, a project this size is a good opportunity to try out a different kind of thread than your usual standby. I decided that I wanted to go for a rugged, modern quilting pattern for the bag. In part to make sure it was strong and in part so that it did not look too much like a quilt. However, you could do any kind of quilting, including hand quilting instead.
In the picture above you can see how I quilted the top of the bag. I started in the middle and worked to one side and then returned to the middle and worked the other way. This approach minimizes any bubbling in the middle of the bag caused by the quilting pushing the fabric in one direction as you quilt.
I used a walking foot and a stitch length that was about double my usual sewing length - 4 on my machine. I sewed from one end to the other and then turned the piece around and sewed back. I tried to stitch purposely wavy - but not too wavy - lines that were ⅛” to about ⅓” apart or about 5 or 6 in each 2” square. This density of quilting makes the bag a bit corduroy-like after it is washed. It is easier for me to stitch mostly straight lines using the side of the presser foot as a bit of a guide, so I challenged myself to make the lines wave and wobble a little while using the seam lines to keep the stitches from leaning too far over in one direction or the other. Again, there is no order in the spacing or the wobble, just be a random and don’t overthink it. Quilt all over the entire bag in whatever style you have chosen.
4. Constructing the Bag and Binding
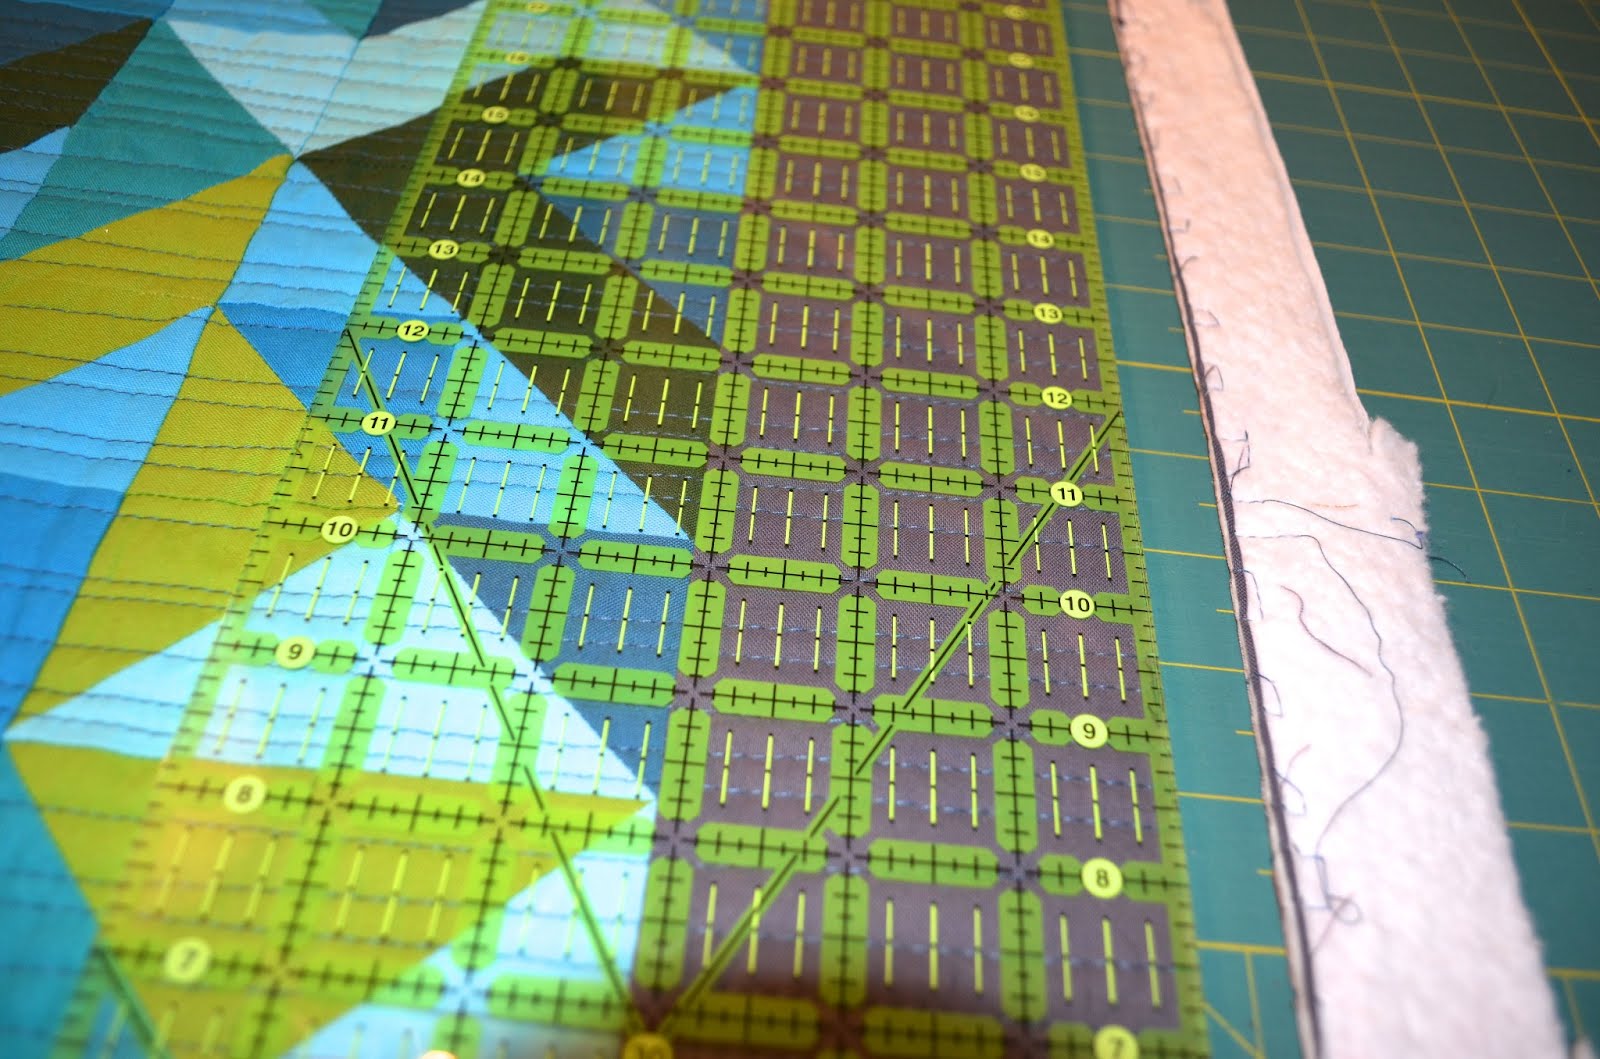
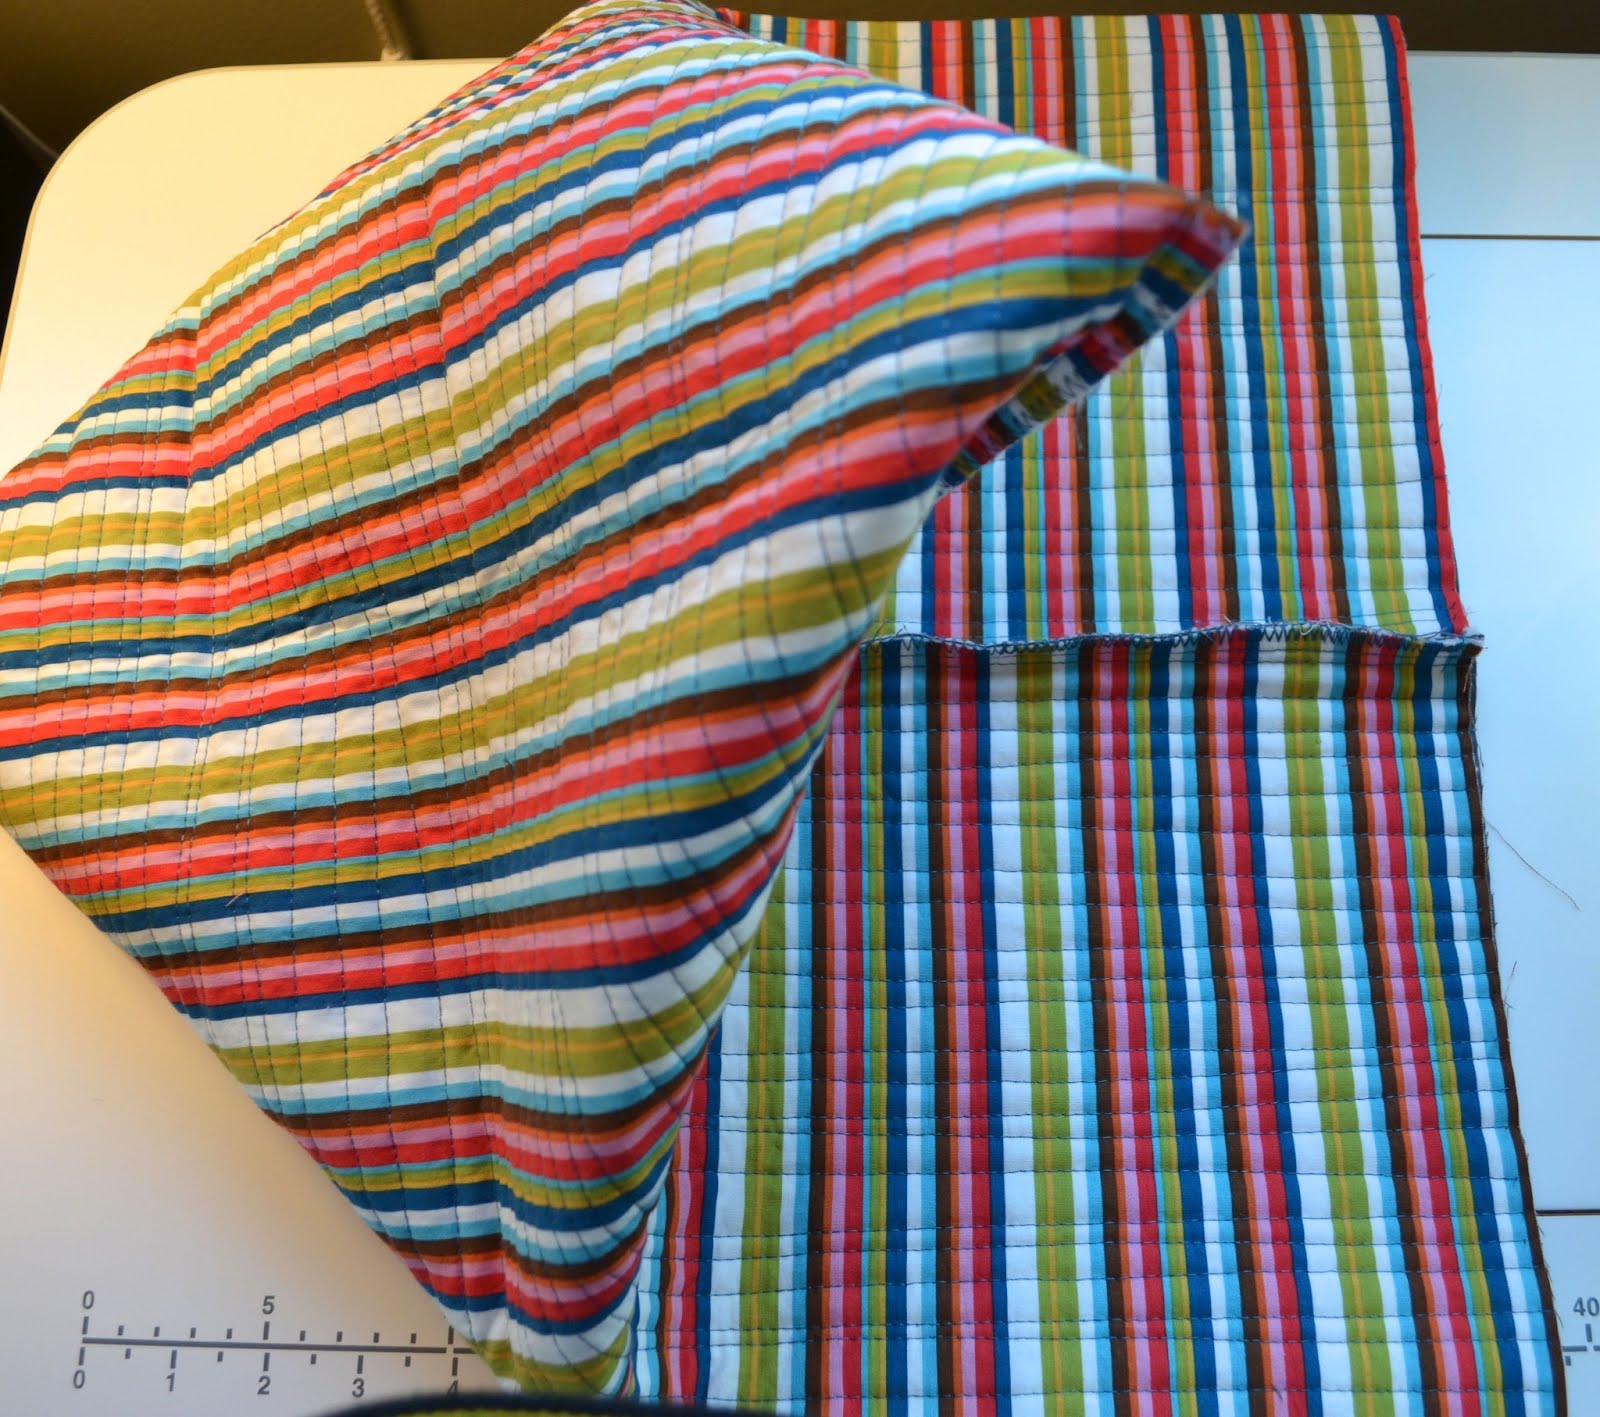
The next step is to trim the bag. Dense quilting will cause the fabrics and wadding/batting to tighten up and it is unlikely that you will find the edge of your neutral sashing even after quilting. Line your ruler up with the edges of the coloured panel and measure a distance to the side that will allow you to trim a nice line along the whole side of the bag. Make note of your measurement and use it on the opposite side so the sides are even. Use a similar approach for trimming the top and bottom. 
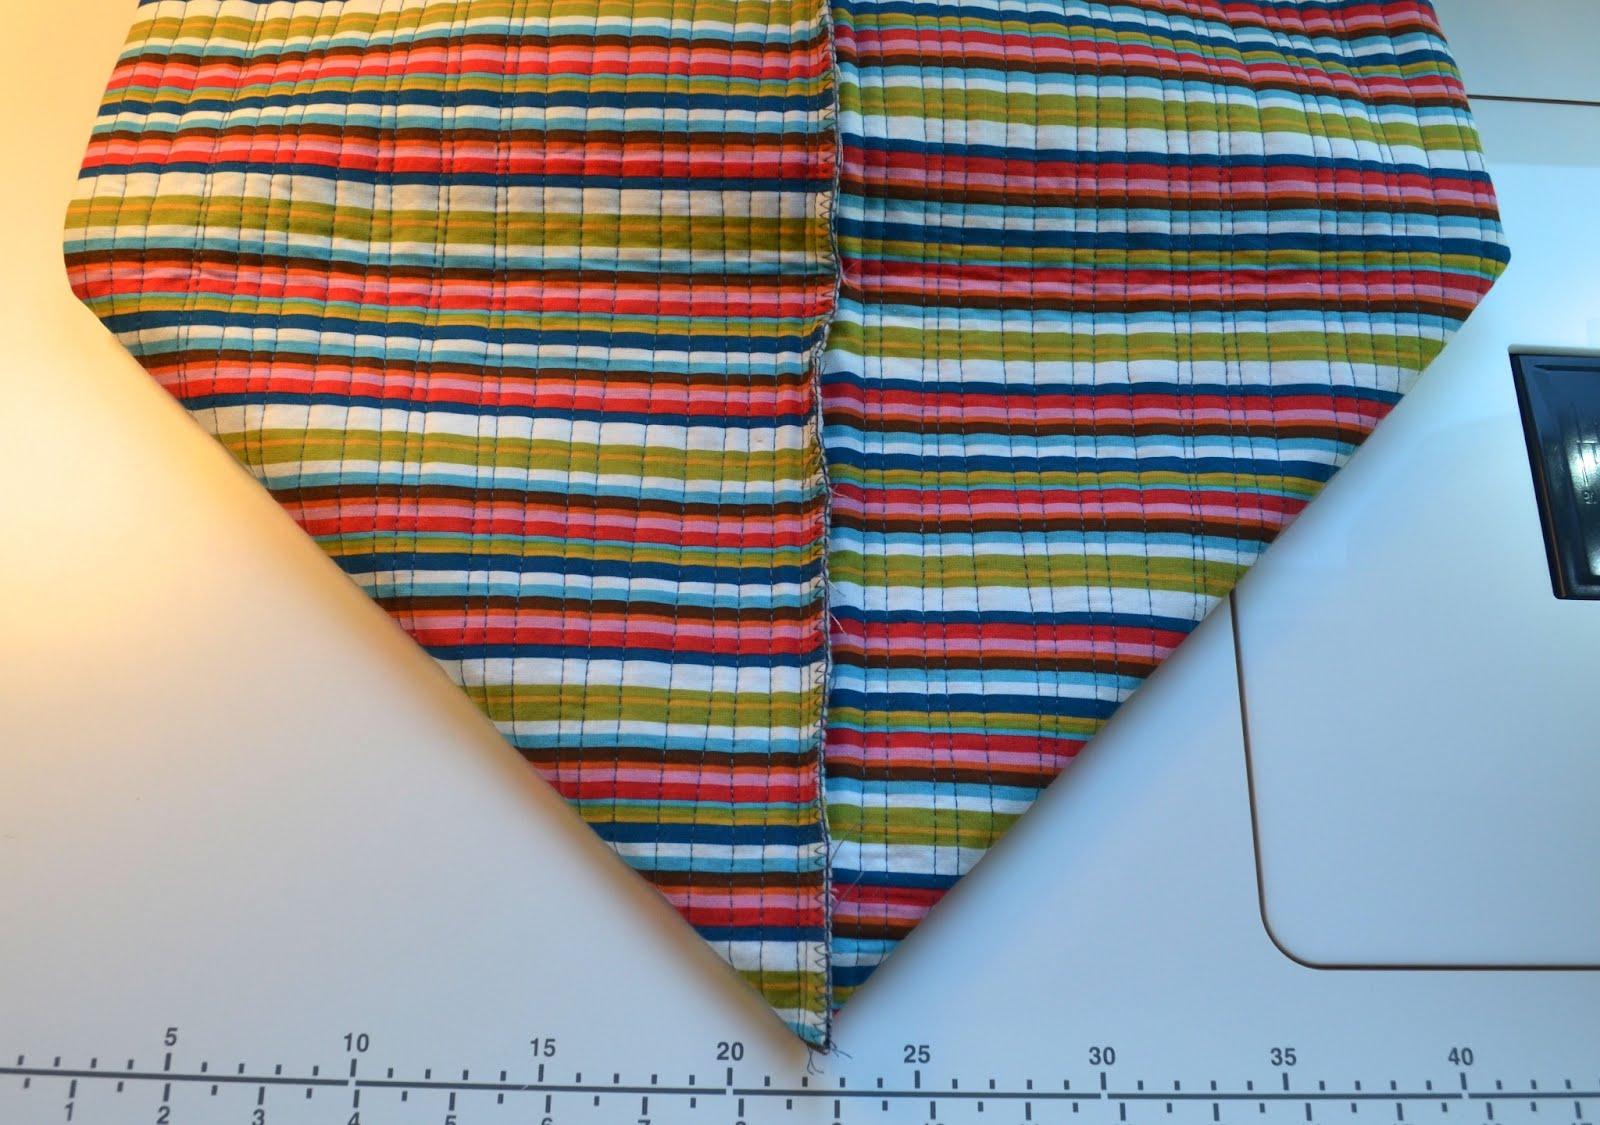
Fold the trimmed panel in half so that the tops of the bag meet and the right sides are facing each other. Pin the side seams and then sew them together with a ¼” seam. I used my walking foot to sew these seams using a stitch that was a little longer than usual (3 on my machine) and continued to use the blue thread. Then zig zag stitch the edges of the bag just to the edge of the stitched line. Guide the edge of the fabrics through the sewing machine so that the right side of the zig zag is stitched right off the fabric. This gives the raw edges a nicer finish. 
In the picture above I am pointing to the stitching line and the zig zag that is to the outside of the stitching line. I left the edges of this seam like this. However, if you wanted a totally finished seam, you could add a binding to this seam at this point.
The next step is to box the corners of the bottom of the bag so that it will sit upright and have a defined width. You could customize this bag by either skipping this step or boxing the corners differently for a wider or narrower bag.
Once you have boxed the corners, it will seem like the simplest thing, but the first time it feels counter-intuitive. With the bag inside out - right sides together on the inside - fold it so that the seams meet in the middle and the bottom starts to form a diamond shape.
Flatten out the bottom diamond shape and then flip the bag over maintaining this shape.
In this picture you can see the bag flipped over. The side seam is now running from the middle of the top right down to the point of the diamond and there are equal amounts of fabric on each side of the point.
I wanted the bottom of the bag to be just a little larger than 4” as that is about how wide the side of the bag was after I sewed the seams up. To check your bag, turn it right side out and measure the width of the grey part from one coloured panel to the other.
Place your ruler on the end of the point of the bag, using the seam line to line up the ruler straight. Move the ruler up and down until the distance from one side of the triangle to the other is equal to the width of the bag you want to have. Don’t worry about the fact that it looks like there is an uneven amount on each side as the seam line is folded over at this point. You can see in the picture that I measured a 4.25” width for the bag bottom. Draw a line with a water soluble pen or pencil along the ruler at this point. (Don’t be distracted by the stitch line in the photograph caused by the stitching I ripped out from my first attempt and don’t be afraid to rip out this seam if you make it too wide and then try again.)
Stitch along the drawn line and reinforce the edges - I stitched the line and then reversed and stitched it again. Then zig zag stitch on the side closer to the point for extra reinforcement. Generally when making a bag, I then trim off that extra triangle of material but for this grocery bag I just left it in place to add some strength at the corners. You can decide what you prefer, but don’t trim these triangles until you have at least turned the bag right side out and checked that you are satisfied with the size of bag bottom that your boxed corners have created.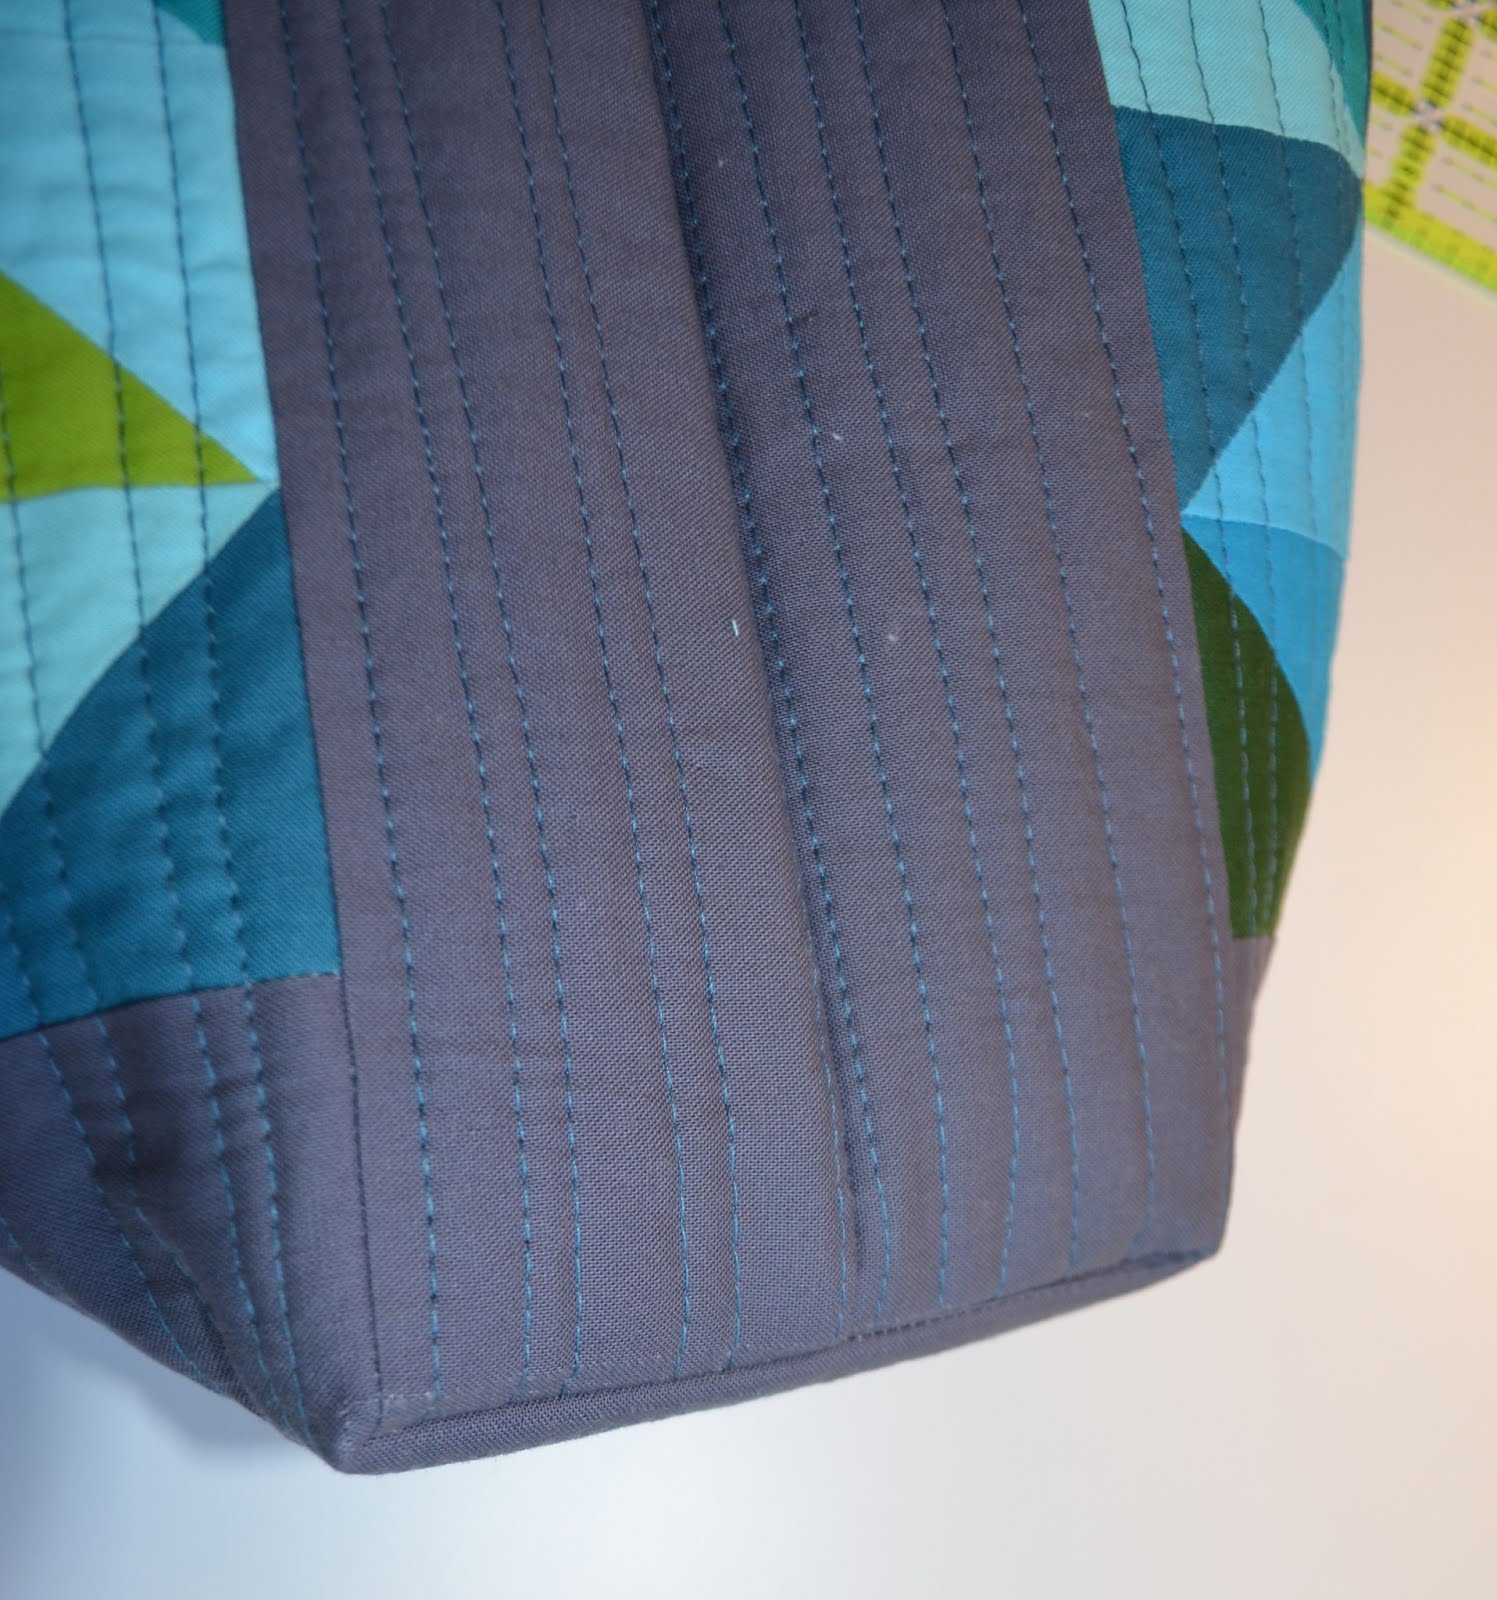
The picture above is how your bag bottom and sides should look once you have boxed the corners and turned it right side out. Repeat all the steps for the other corner.
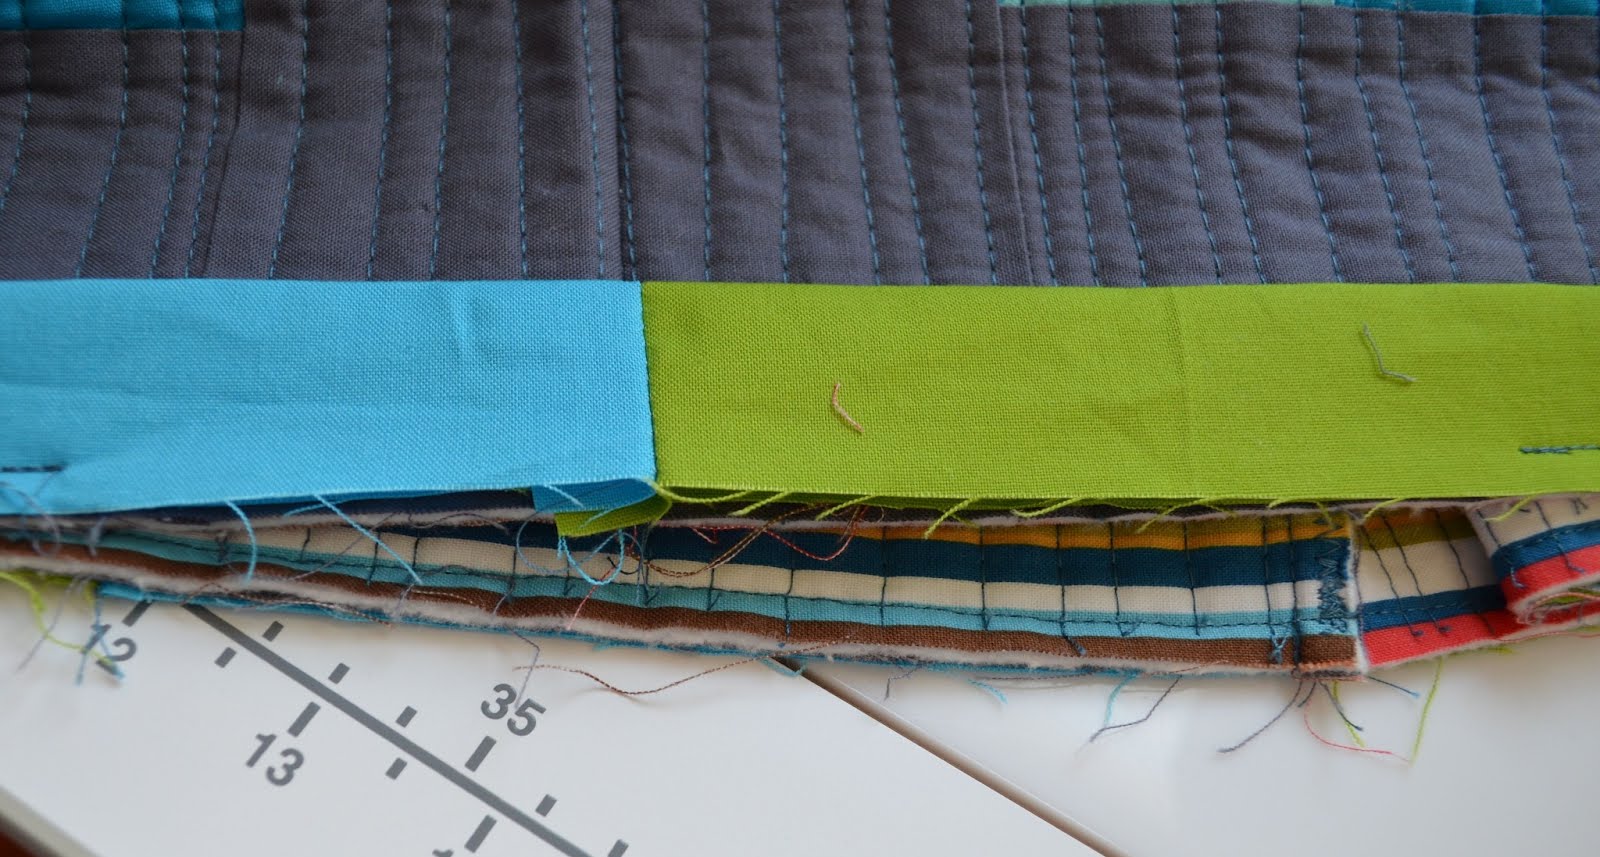
Here is a look at the inside. You can see how I just left the corners to fall inward on the bottom for reinforcement but you can easily trim them off as well. Again, if you don’t like seams unfinished, just add a binding strip along them - use the same method as set out later to finish the top of the bag.
For the handles, take your 8” x 42” (WOF) piece (or longer piece if you want longer handles) and press it in half with wrong sides together. Then open and press each side inward to the middle seam. With the edges folded in, fold it in half again and press. The handle is now about 2” wide and is 4 layers thick. Wider and multi layer handles like these make it easier to carry heavier bags without the fabric cutting into your hands, so consider your plan for the bag as you decide on the handles but you can change the handle width and also handle length as you prefer.
Sew along both outside edges of the handle strip and then add some sewn lines in the middle of the two outside lines. I again tried to make wavy lines. Then cut the handle strip in half so that you have two handles.
Take four bits of fabric that are about 3” x 2” and press in the short edges about ¼”, then press the piece in half, unfold and press the edges to the centre and then fold in half, just as you made the handles. I used the bits that were left over from cutting the strips for the colourful panels.
Place these tabs onto the bottom of each of handle ends and pin in place. Stitch a line across the tab close to where it meets the handle, remembering to back-stitch at each end. This line of stitching is seen in some of the pictures that you see later on. Set the handles aside for now.
Prepare the binding that will go around the top of the bag. You can use one colour or go for a scrappy look. Measure the distance around the top of the bag. If you want to make a two colour binding like mine, divide that distance by 6 and cut out four binding pieces that are 2.5” wide to be that measurement and two pieces that are about 4 inches longer. My bag is about 34” around so I cut the binding pieces to be 2.5” wide by 6.5” with two longer pieces. Starting and ending with the longer pieces, sew the binding pieces together. Press the seams open. Fold it in half with wrong sides together and press it in half.
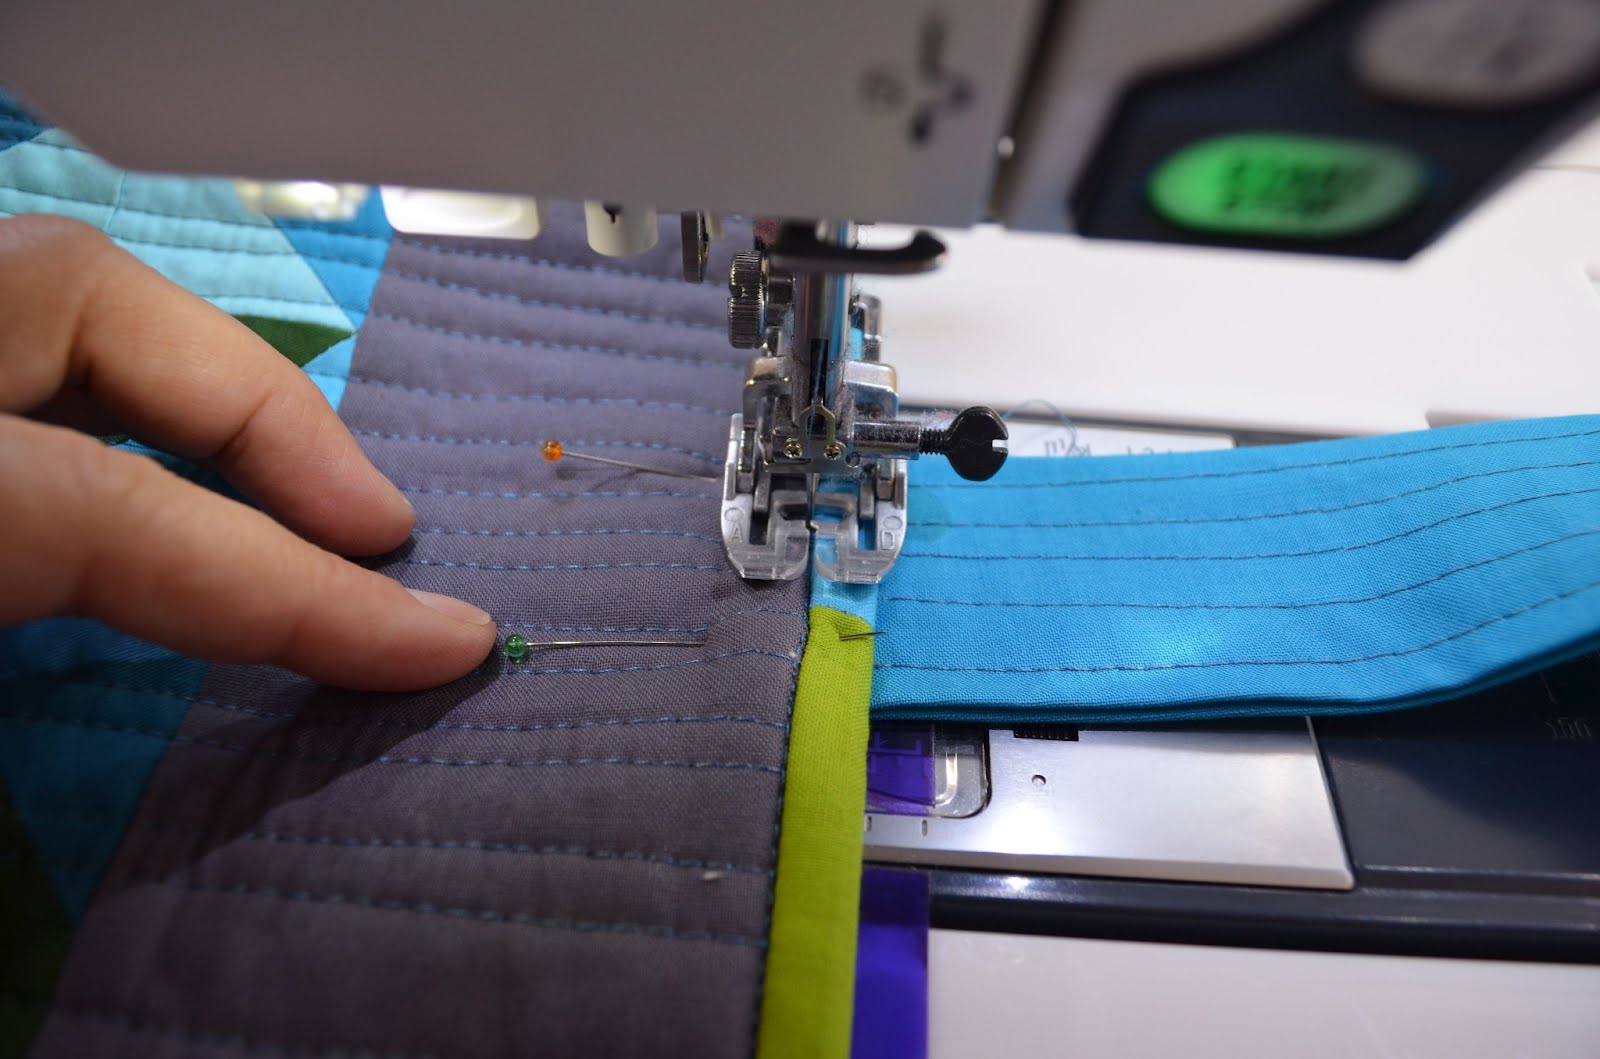
Place the binding with the raw edged lined up with the outside edge of the bag top. Starting about 6 inches from the beginning of the binding, stitch the binding to the top of the bag with a ¼” seam. I use a slightly longer stitch than usual to accommodate the thickness of the seams here - on my machine I set the stitch length to 3. Stop stitching about 6” from the starting side seam (see next picture).
In this picture you can see that the stitching on the top binding began a ways after the side seam and stopped a ways before that side was reached again. Join the binding as you would on a quilt. I make a square join, but if you prefer an angled join go ahead and use your prefered method. I remove the piece from the sewing machine and fold the binding ends as shown to have the pieces just meeting. Finger press (or take it to the iron if you prefer).
Trim the two sides about ¾” from the fold. Finger press again.
Open the binding up, line up the finger pressed lines and place a pin to join on that fold line with right sides together.
Pull the ends over and stitch along the fold line. Flatten out the top of the bag and check to make sure that the seam in the binding is in the correct location so that the binding will be flat against the bag top, not too loose or too tight. If the join is wrong, resew it. Once the binding is the right length, trim the seam allowances at the join and finish sewing the binding to the top of the bag.
Press the binding towards the top of the bag and then fold it over to the inside and press again. At this point you can hand sew the binding to the inside of the bag or machine stitch it.
I machine stitched by stitching in the ditch along the front of the binding as shown in the above picture. Once you have set up your presser foot, run your finger along the top of the bag beside the binding, essentially along the ditch. You should be able to feel the binding as it is folded around the back and know that it is overlapping the ditch where you will be stitching and thus caught by the machine stitches. Go slowly and keep pulling the binding to the inside and flatten it in place before sewing forward until you have gone around the entire bag top. Check the inside and make sure that your stitches have caught the binding all the way around the bag. If not, take out those stitches necessary and stitch the missed part again. Your stitches on the front of the bag should be almost invisible as they will be in the ditch just next to the binding on the front. You can see that in the next picture.
Line up the handles where you would like to place them. You can attach them with pins and try out the bag - put some fabric in it and test it out. I placed the handles 2.5” in from the side edge of the bag, which is also the edge of the colored panel. To do this set the bag on a table and place your ruler along the side edge and the top binding. Place the handle at the 2.5” mark on the ruler and pin in place so that the tab sits just under the binding. Repeat on the other side of the bag, being careful not to twist the handle as you pin it in place.
In the above picture you can see how the handles are placed inside before they are stitched down. Also you can see the stitching that was done earlier across the tab.
\
Stitch along the ditch, beginning before the handle and ending just after it. Make sure that you back-stitch at each end. If you want further reinforcement of the handles, after you have checked to make sure that they are placed correctly sew this line again. If you keep the stitched in the ditch they will not show. Another way to add reinforcement is to then do a zig zag stitch on top of the binding along the handle - this stitching will show on the front of the bag so is a matter of your preference. I added this stitching on the red version of the bag that I made. Repeat for the other handle.

After using the red version a bit, I felt that leaving the tabs as they were on the inside of the bag looked messy so I recommend you take a few minutes to handstitch the tabs down. You can see how I did that in the next picture, which also shows you a view of the rest of the stitching inside the bag - the binding, the top of the tab and the handle to the bag.
You are done, pick up your bag and enjoy it! I love how the dense quilting gains texture and interest once it is washed so I immediately throw the finished bag into the washer and dryer. Since I plan to put groceries in these bags they need to be washed regularly, but it is your call as to when you decide to wash it the first time.
There are many great internet resources for each step in making this bag. Basically when you have finished it you will have performed all the steps of making a quilt as well - piecing, sandwiching, basting, quilting and binding. I hope you enjoyed this tutorial.
Don't forget to link up your Q2 finishes - the Q2 post-quarter link is open and it will close at midnight MST, July 7, 2013. And if you still have some UFOs I hope you will join us for Q3 of the FAL, Q3 FAL lists can be posted starting on July 8.
14 comments:
Love that handle method - thanks for sharing here xxx
gorgeous bags. The hst are brilliant.
Woo hoo! One of my favorite tutes. I love this bag 100%. It's absolutely beautiful and the tute is so well written. Three cheers for Leanne.
What a great bag! Thanks.
That's a great bag and tutorial!
Just wondering if you've been getting my emails.
Carol
Love the bag and all of the quilty features of it - the next tote I make is going to be done this way. I had to laugh at the "random" arrangement of the hst since I recently spent hours fiddling with the layout of a cradle quilt to make it look spontaneous.
oh I love seeing this again. I really need to make one of these - I like it so much!!
I was one of those people at QuiltCon taking a picture! Thanks so much for the tutorial. I'll give it a try.
Great tutorial! Love the bag :)
Leanne this bag is gorgeous! I have to try this, I've been debating what kind of tote to create. [And, sorry this is random, you have the perfect hands for tutorials, what nail beds!]
Fabulous! Glad you broke the rules--why not? I think there are so many good things in this one--how to box corners, create a HST design, quilting. Excellent!
I love these bags!
Got to love a good, unique shopping bag. The inside has made my eyes go a wee bit funny though!
Very nice designs. I like it, Thanks for sharing.
Non woven bag making machine
Post a Comment