

I'm back today with another Decipher Your Quilt post. It is my turn to talk about how to decipher circle blocks.
Jess, from Elven Garden Quilts, and I have found ourselves bogged down in the things that life throws at one over the last couple of months, and so Decipher Your Quilt has been moving at a more than leisurely pace. We do hope to be a bit more predictable in future, with our next post after this one planned for September 18.
For today, I am going to explain the math behind making a pieced circle block. We figured that it is fairly easy to identify a circle block, even a quarter or half circle block so today the focus is on the tools you need to make your own circle, any size and any time.
***I have made several changes to this tutorial since I wrote it. A dedicated reader emailed me to point out a significant error, thank you! As a result, you will see two different sets of fabrics in the pictures, as I used the best of the photos for the finished tutorial. ***
There are many ways to add circles to your quilts using appliqué (regular, reversed, porthole style, etc.) and the math behind that is simple, make your circle and add it onto, or under, your work. However, when you are piecing circles, you need to understand how to figure out the seam allowances of the interior and exterior pieces.

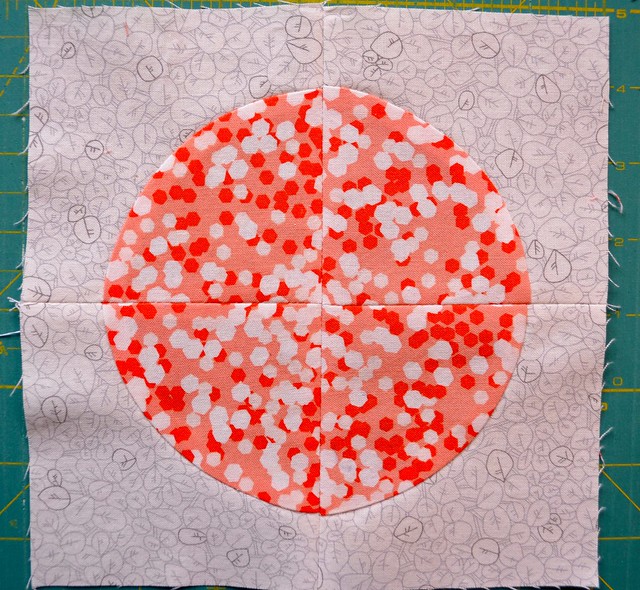
First, decide what size you want the finished circle to be. For this example, I am going to piece a circle that is 6" in diameter when it is all finished (6" across its widest point, going through the middle).
To draw a 6" circle, I get out my compass (that silver gadget in the picture - they are available in geometry sets like the kind you buy for your kids most every year at the start of the school year). I open the compass so that the distance from the point to the pencil lead is 3" - the radius of the circle or half the diameter. I measure my compass on my cutting mat like you see above.
Now, if you don't have a compass there are some options:
- Search your child's or your friend's child's school supplies to borrow one or go and buy one, they are very inexpensive and a good tool for quilters. For example, they are also helpful when drawing nice circles for appliqué.
- Find a plate or pot lid or other circle in the size you want to work with.
- Attach a string to a thumbtack on one end and a pencil on the other. Measure the distance from the point of the tack to the lead of the pencil, with the pencil standing up like the compass arm is standing.
- Truly, a compass is easier and a good tool to have.
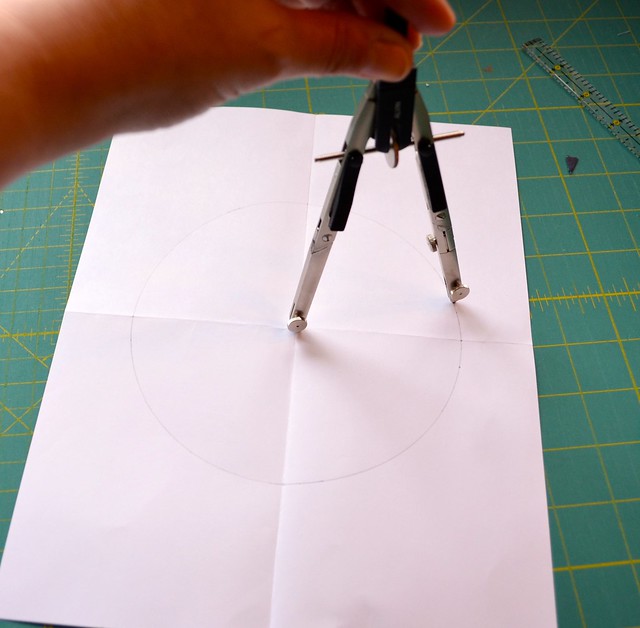
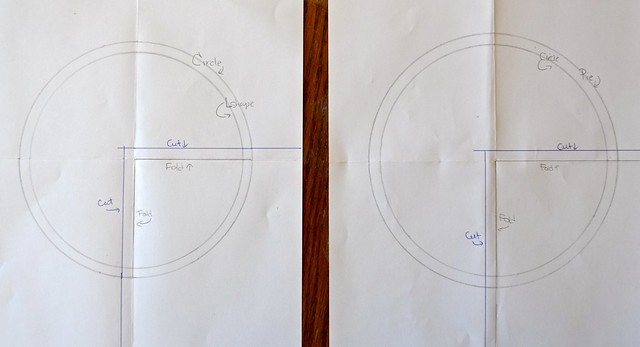
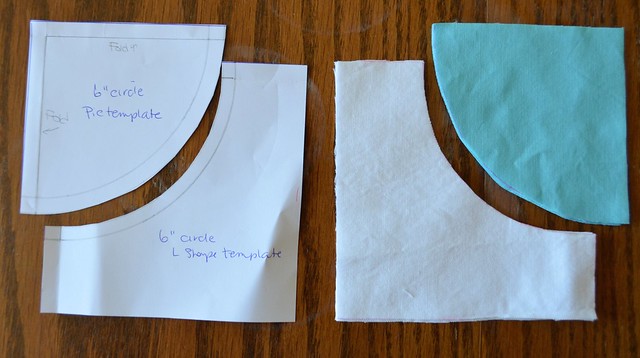
Take a sheet of paper and fold it in half in one direction, open it and fold it in half in the other direction. Open it up so you have the folds as seen in the picture above. Place the compass point at the intersection of the folds and draw your circle which will have a 3" radius and 6" diameter.
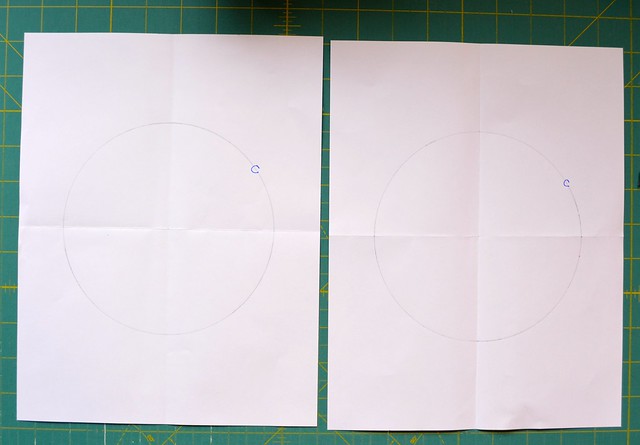
Get a second sheet of paper and repeat. Mark this circle with a C, or write the word Circle with the C being right on the drawn line.
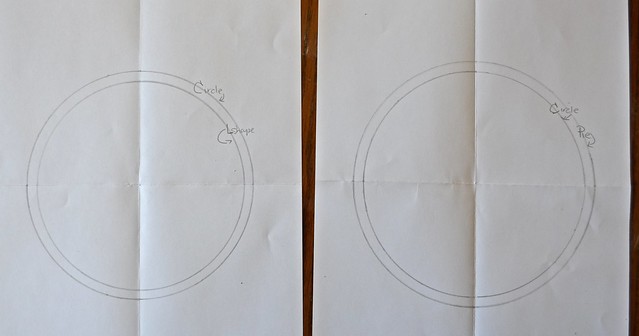
Here is the tricky part. First, adjust your compass to a diameter that is 1/4'' larger then that of your first circle size. For our example that is to 3 1/4" . On one of the circles, place your compass point right at the same spot and draw the larger circle with the 1/4" longer diameter outside the first circle line. Mark that circle as the Pie.
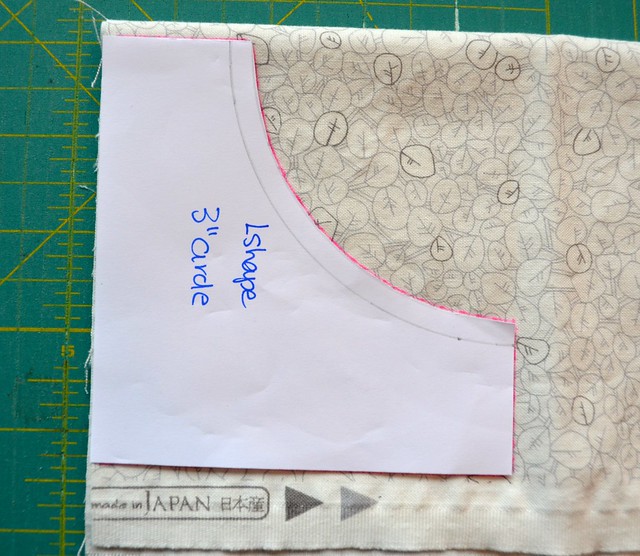
Next, adjust your compass to a diameter that is 1/4'' smaller then that of your first circle. For our example that is to 2 3/4". On the other circle, place your compass point right at the same spot and draw the smaller circle with the 1/4" shorter diameter inside the first circle line. Mark that circle as the L shape.
[Note: if you did not find / buy that compass and you are using the string method, just remeasure your string length instead of adjusting the compass arms. If you are using the pot lid method, then measure 1/4" from your first circle line on either side and mark a number of those points. Once you have several points, free hand connect them to draw out the other circle.]
For our example, I am making a pieced circle using what is known as the Drunkard's Path block, which is a quarter circle. The geometry you use to figure out the overlap is the same if you wanted to piece the circle whole or in halfs, but since I like to make circles in quarters, that is what I am showing.
Next we need to add the seam allowances that are needed to piece the 4 quadrants of the Drunkard's Path circle. Using your ruler, measure 1/4" out from both your fold lines on one quadrant of the markings on each piece of paper. You are adding 1/4" to the quadrant defined by the fold lines, so looking at the photo above, add 1/4" to the left of the fold line and 1/4" above the fold line to make the bottom right quadrant larger in each case by the seam allowances required. Label these lines as Cut and draw them out to the edge of your paper.
(*** This is the error I made in the first version of this tutorial. I forgot to add this seam allowance and a lovely reader pointed it out so that I could correct the tutorial.***)
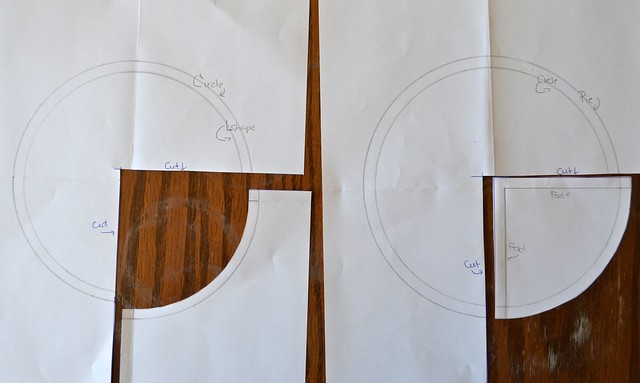
Then, using your "paper" scissors, cut the templates out of each circle, along the cut lines. On the one marked with a Pie line, cut the curve along that Pie line. On the one marked with the L shape line, cut along that L shape line. Both templates will have the original circle line also showing and if it is not, you have cut the wrong line and will have to draw it again.
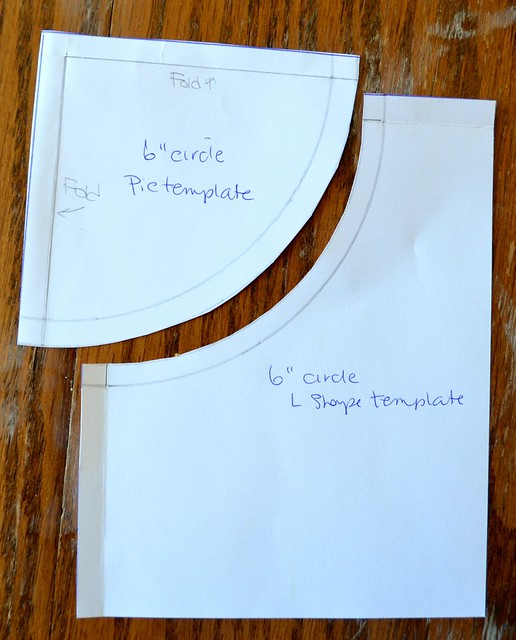
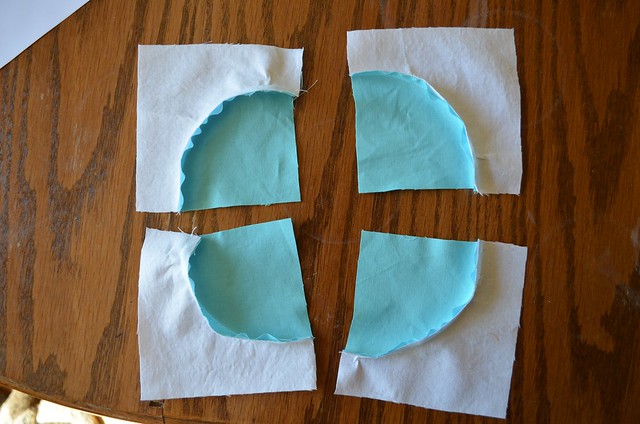
It is good to label the pieces now. Here is another tricky part and the key to the geometry and math behind piecing circles. Look at the Pie and the L Shape. They do NOT match up - the Pie shape looks longer at both ends and the curves don't fit together. If they match up, you made a mistake.

Look what happens if you overlap the two pieces along the first circle line - note that they are overlapping by 1/2". They match up now. The overlapping parts are the seam allowances for each side of the pieces you will sew together.
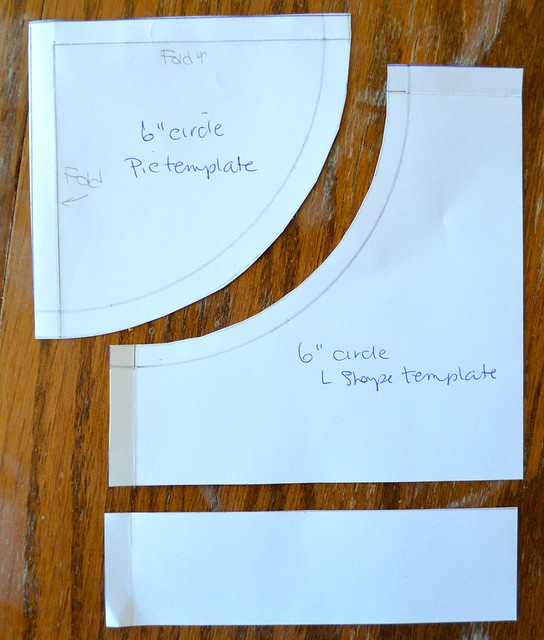
I like to trim my L shape template so that the width at the ends of the L is the same and I piece with a wider L shape than I need so that I have room for trimming.
In the photo I have trimmed the ends of the L shape to 1 1/4" because that is what fit on my paper. This is going to mean that I will end up with an 8 " unfinished block - 6" diameter circle plus 2 times 1" after seaming on each side. If you want the outside of the block to be bigger than what fits on your paper, just tape on more paper on the two straight edges of the L shape and trim to the size you want your block to be plus 1/2" for seam allowances.
For a circle, you will need 4 L shapes and 4 Pie shapes. To save time, I generally fold my fabric into 4 layers so I can cut out all 4 of each piece at once. I trim one edge nice and straight. Lay your L shape onto the fabric with one of the lines along that nicely trimmed line. Since these are paper templates, DO NOT try to cut along them with a rotary cutter as your fingers will be in grave danger. Instead, get a marking pen or pencil and trace around the edge of the template.
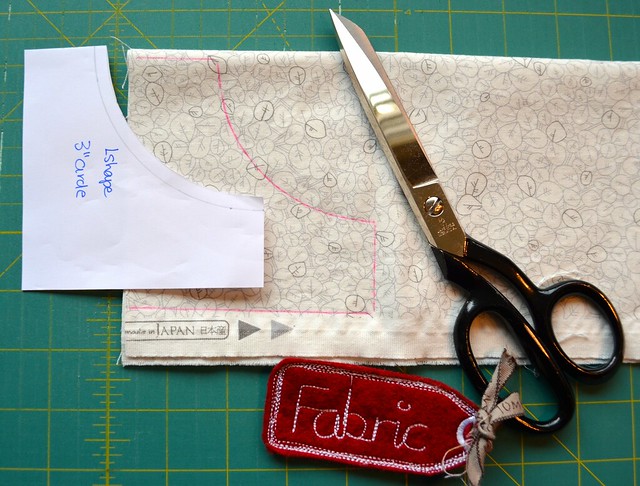
Then holding all four layers together carefully so they don't shift as you cut, and using your fabric scissors, cut out the fabric along the traced lines. (Isn't that fabric tag lovely, it was a prize from the wonderful Benta and it keeps my entire family from wrecking these lovely sharp scissors.)
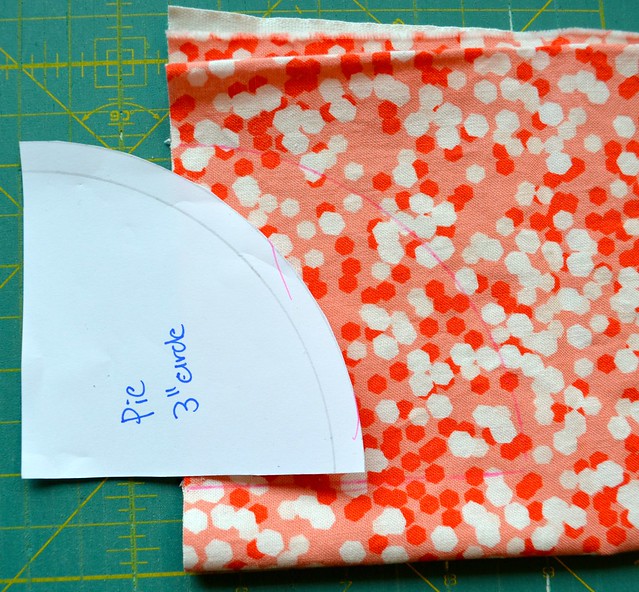
Repeat the same procedure for the Pie shaped template.
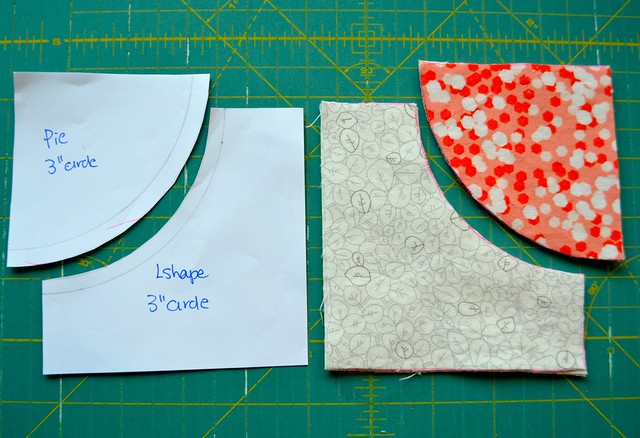
You can see that it seems unlikely that this is going to work out.
Even when you cut the fabrics with the correct templates, it still looks like an unlikely proposition.
Piece the Pie shapes to the L shapes. There are many ways to do this, with pins, without pins, with one pin, with glue basting, and with special sewing machine feet. I recommend that you watch my 1 minute 18 second video which is referenced in the blog post here and give my no pins, no fancy equipment, method a chance. Most folks who do are chain piecing these circles in no time. However, if you google piecing drunkards path circles, you will find many helpful tutorials for every possible piecing method and find the one that works best for you.
Remember that you cut both the L shapes and the Pie shapes on a curve so those are bias cuts. The pieces will easily stretch along them. Press them gently and carefully. I press the back seam towards the Pie shape.

Press the front carefully too, watching to avoid any bulking up along the sewing line.
Now, when you do a lot of these, eventually you are able to piece them without much, if any, need for trimming. But, like making HSTs, the pieces benefit from some trimming, especially if you started with larger L shapes than you needed. I decided to trim these pieces to become 4 1/4" squares, again so that my unfinished final block would be 8". [Note: if you want the L shape to disappear at the edges of the circles, you would trim the L shape to be just 1/4" at the two ends of the L.]
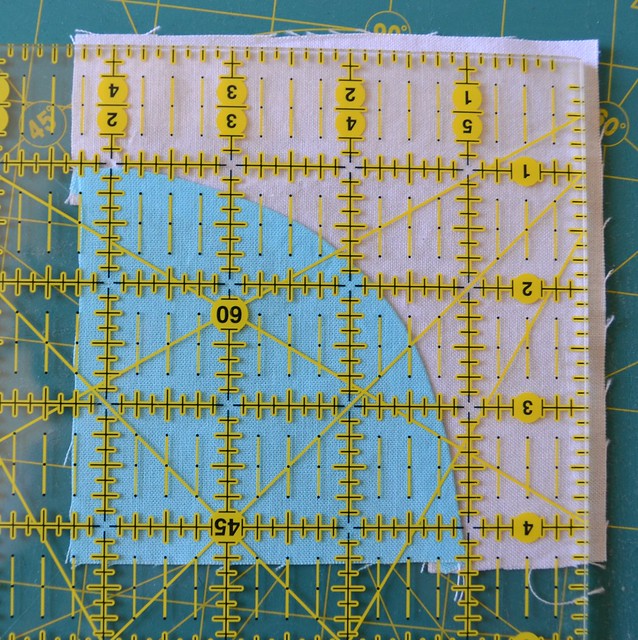
Here is another tricky part. Watch the placement of your trimming ruler so that the radius is not shortened by this step. We had a 3" radius for the original circle we drew and we added 1/4" for the seam allowance. That first circle line we drew was the stitching line.
Look at the photo above. As we need 3 1/4" of radius - blue fabric - for the pie shape, place the ruler so that both of the two ends of the blue pie shape are 1" in from the edge of the L Shape. Then make sure that there is 3 1/4" of blue available to trim at the corner of the pie shape. Trim off the excess L shape fabric.
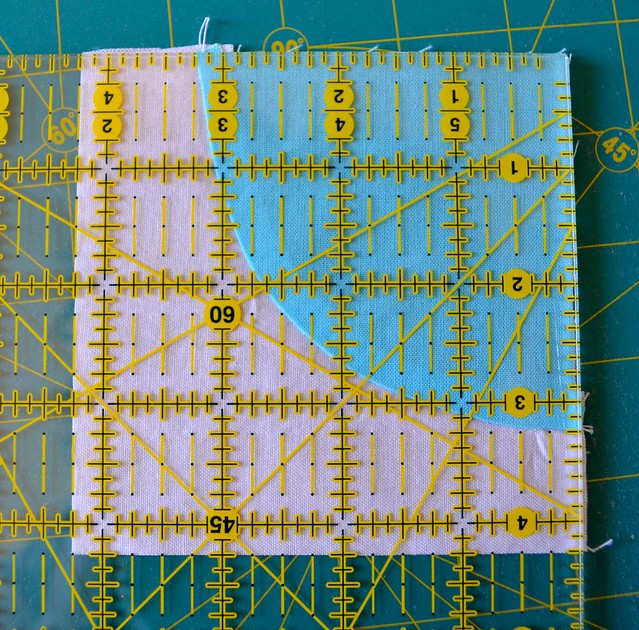
Flip this unit over to trim the other side. Line up the outside of the L shape to the 4 1/4" marks, note that the ends of the pie shape both hit the 3 1/4" mark, and then trim the two outside edges.
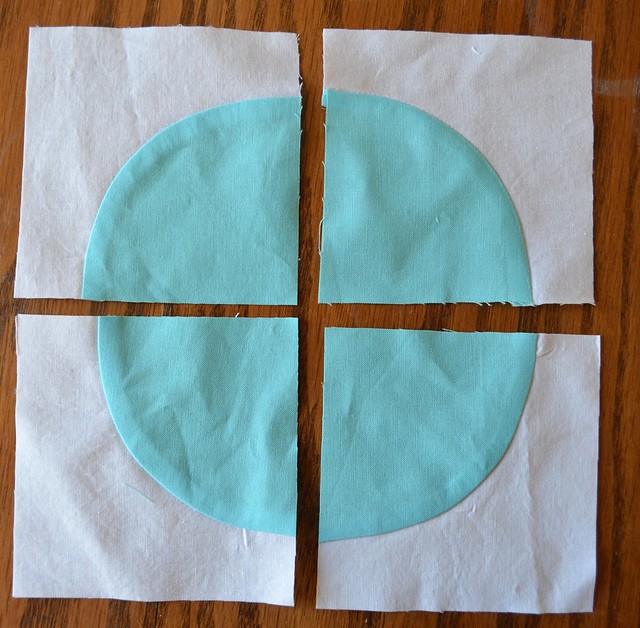
Repeat for all 4 quarter circle units.
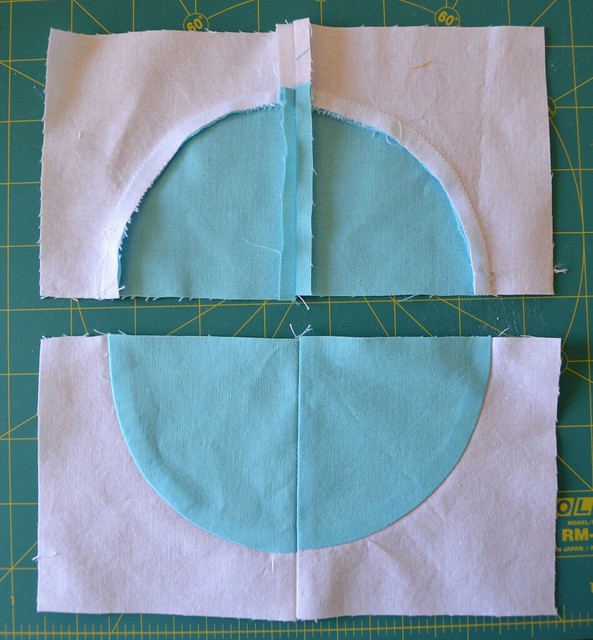
Piece two quarters together and repeat. I press the seams of circles open and it is worth stopping to press at this point.
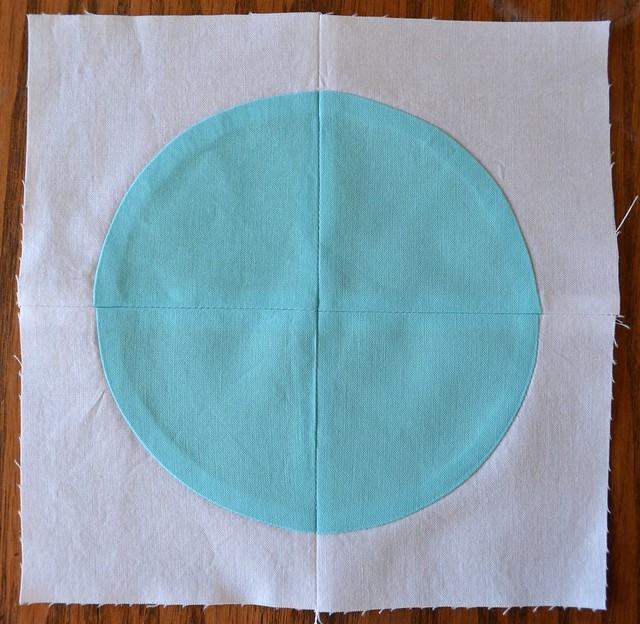
Piece together the two halves of the circle. I generally match the seams at the centre of the circle in priority to matching the edges, although I try my best to get them both to match and ease a little as I sew the seam if need be. You can see from this sample that the seams are not perfect but they are very close. Once the quilt is quilted, this amount of imperfection generally is not noticeable and it is totally gone after washing. If you are bothered, sew a short basting stitch at the edges where the edges of the circle meet, then line up the middle seams and ease any bulk in as you go.
There you have it, the geometry and math behind pieced circles. Now you can make one any size, without any instructions or anyone else's templates. Before you say, I can't, or it does not make sense, consider giving this a try, just as I have written it out. Some of this geometry is better understood once you actually do it once or twice before you ask too much. And then let me know all your questions. If there are lots, I will do a follow up post addressing them.
I also assure you that sewing these curves gets easier quickly if you just practice a little, so don't let the curved piecing stand in your way from adding pieced circles into your quilt.
Jess, from Elven Garden Quilts, and I will both be back with the next instalment of Decipher Your Quilt on September 18 - unless a supplemental circle post is needed in the meantime.
Best,
Leanne
18 comments:
more hours in the day please to study all the info you give us on making stitching etc easier. Will be back to this blog another day when I have some time to spend on it
This is such a super resource to have! Thank you, Leanne!
Thank you for the tutorial. If you want to set in a whole circle without cutting into 1/4 s, go to episode 704 of the quilt show. Dale Fleming demonstrates her 6 minute circle, and it is so easy, even I can do it. No seams to match up.
Pinning this!
Great tutorial!
Great explanations, Leanne.
Another option for drawing circles is a computer drawing tool, such as Photoshop.
You might consider adding 1/4" to the straight sides where you cut the circle into quarters too.
Very helpful - thank you!
I do like these but I got a die for my die cutter. ;^)
"You can see that it seems unlikely that this is going to work out" You crack me up, Leanne. Thanks for this very timely post! It's curved piecing month in my VMQG round robin and I want to try quarter circles. I'm going to give it a shot. If you can believe it, I haven't tried piecing a circle for about 10 years since I started a very old NY Beauty project (which I've since given away). Thank you!!
The best thing about this post is that it means that how I figured it would work is right LOL! I did try the pencil and thumbtack route... no way! Will be looking for a compass soon :)
Can I cut a curve based on the size I want the quarter circle to be and then trim 1/2" off of the two narrow sides of the L-shaped piece? I want to reduce the amount of trimming because I think cutting out these blocks is way worse than curved piecing!
Perfectly explained! As an extra- pressing towards the pie makes the circle look on top, pressing toward the L would make it look underneath!
PS thanks for the name check!
wow! this was So helpful. Thank you so much!
Well explained! Thank you!
So I went out and bought a compass... as you are so inspiring. :)
But when I set out to draw my circle with the compass it kept moving away from the measurement I set it on. Any advice?
Great explanation. I've made several quarter circle blocks but have always used a template set I have so never gave much thought to how to draft up my own size. I like the way this method works.
Yhank you so much to the "circle pap" explanation.Hugs
Thanks again for this, used it again today!
Post a Comment