Sunday, January 8, 2017

2017 Finish A Long - Link up your Q1 Lists of projects to finish!


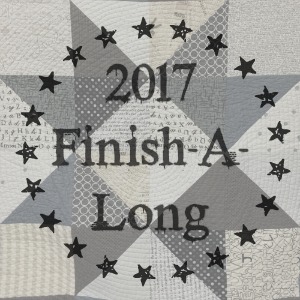
2017...are you ready for a new year? A new year a new list!

As you are probably aware, the 2017 FAL is remaining global - a community of bloggers across the world, jointly hosting the FAL. Our hosts are:
  • Sarah - Sew me - Northern Ireland
For those of you who are new to the FAL, it is a place to find motivation and encouragement to complete those unfinished projects that are hanging about becoming UFOs. Every quarter you post a list of projects you hope to finish in the next three months, and then at the end of the quarter, you post a link from your blog, Flickr or Instagram of each successful finish from your original list.

Each finish is an entry for wonderful prizes from our sponsors. There is no penalty for not finishing a listed project, so feel free to make your list long or short, as you wish. The 2017 Schedule and Rules for the FAL are on my permanent FAL page, let me know if you have any questions. Here are the fantastic and generous sponsors for Q1 of the FAL - you can see each of their prizes listed under their logo (think about visiting them and saying thank you):


As you may recall from last year, there was a return of tutorial week at the end of each quarter, between the opening of the link for finishes and the day that link closes. Are you enjoying this? Please share your thoughts in the comments section below! This will take place each quarter. Each host works hard to put these together so I hope you are visiting their blogs to encourage them.
If you have a tutorial that you would like to share, please let me or another host know.

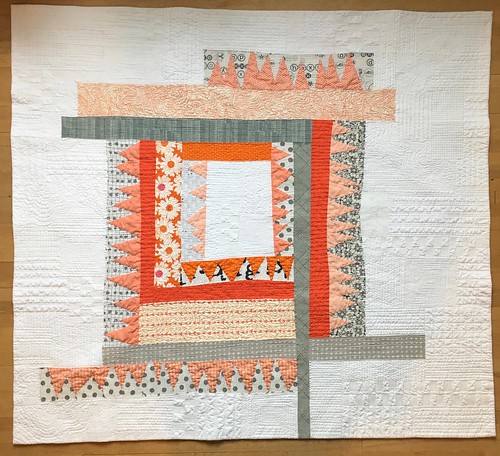
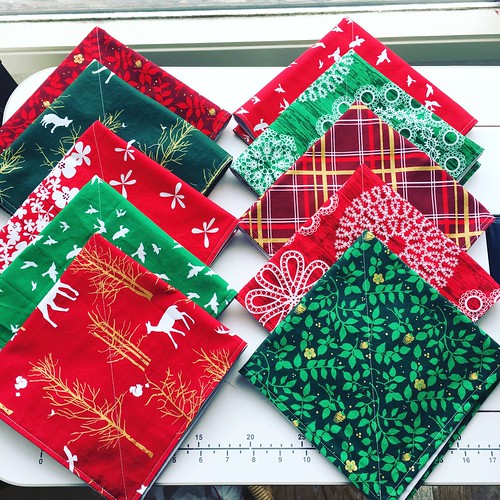
It's time to round up those projects you want to finish over the next three months, take a photo of each one and make your list. In order for your projects to be eligible, they must at least be a tangible project at the start of the quarter.  That means, at the very least, a fabric pull matched to a pattern, a quilt top needing to be quilted, or a half knit jumper. So while we love to see your bee blocks, the "finish" is when they are a completed, usable project.

It is very helpful if you tag your list as #2017FALQ1yourname when posting on social media: Flickr, Facebook & Instagram. Using the same hashtag over the quarter when sharing progress or finishes before the link, helps the hosts find your original list quickly - especially when this is done over a 3 month period. IMPORTANT: Don't forget to link your finishes up when the quarter closes.

The 2017 Q1 link for your list of proposed finishes is now open below on my blog and on each of the hosting blogs. You need only link your list once, on one blog - and that link will show up on all of the blogs. If you are using Facebook, Flickr or Instagram, link a mosaic and put your list in the description. Katy of The Littlest Thistle has a great tutorial on how to link-up if you need it.

We also ask that you become part of the FAL community. Please check out the links of others - visit and comment on their lists. We all need encouragement to get those finishes done, so please share some of your own too. When creating your list there is one thing to remember....No deductions for not completing something so ..... Aim High! Nothing to lose!!!

Well Now..... Get those lists together and get linked up. The Q1 linky party will stay open until 11 pm EST, January 14, 2017- as we are global, you might want to check your time zone to determine your last possible time to link. Remember: you only need to link up on ONE hosting blog and it will automatically show up on all hosting blogs.

I'll be making my own list to post too, I look forward to seeing yours.

Best,


Leanne

Saturday, January 7, 2017

My Q4 Finishes 2016 FAL

Q4 FAL 2016 Goals

That mosaic set out my Q4 Finish A Long goals. I really wanted to finish each of those projects, but alas, I did not. But I did finish 4 of them and I am very happy about that.

Imp

I blogged about Imp here, and shared her progress in several other posts. I am very proud of Imp and she will be showing at QuiltCon 2017.

Winter napkins

I also finished my winter/holiday napkins, and in fact my blog post - here - has a mini tutorial about how to make them.

Summit Shawl

 My actual first finish of the quarter was my Summit Shawl, and I realized that I did not yet write a blog post about it. I will rectify that early next week, it is a lovely piece. You can get the free pattern by Maddie Harrington from Knitty here if you want to give it a try. This is one of those "it looks so much harder than it really is" projects.


My fourth finish is Focus. I also have not yet blogged about her and will do so next week too. I am so proud of this quilt, she was made with no rulers (except for the final trimming of the edge), I wanted very gently not quite straight stripes, a sort of pencil line drawing look. Regular readers will know that I first made a block, then a mini quilt of similar looks and now Focus which is a much larger version (around 50" square, I need to remeasure her, and much harder to make). Focus is going to QuiltCon 2017 too.

I wanted to share these four finishes before the Q4 2016 link up closes. It does so in about 3.5 hours (at 9 pm MST) so if you still have finishes, you might want to get them posted soon.

Tomorrow the Q1 2017 FAL link up opens to post your to be finished lists. I plan to roll over the other projects in my mosaic and add some more, I hope you are making your own list and planning to join us.

Best,

Leanne

Friday, January 6, 2017

Introducing the 2017 FAL Hosts!


While we are bringing the 2016 FAL to a close (don't forget to post your finishes), I am pleased to announce the new set of global FAL hosts for the 2017 Finish A Long! Our new hosts continue to span 3 continents and several countries. Each of them has a lovely and inspiring blog and I hope you will enjoy checking them all out:
  • Sarah - Sew me - Northern Ireland
Please also join me in thanking the outgoing  2016 FAL global hosts. Many hands has made the work of hosting the FAL much easier, but still each host has given considerable time to supporting the great community that mades up the FAL. 

A special thank you to each of the 2016 FAL global hosts:

I hope you will be joining in the 2017 FAL. Also feel free to grab the 2017 FAL logo and use the hashtag #2017FAL. You can also grab and use the button:

grab button for shecanquilt
<div class="shecanquilt-button" style="width: 150px; margin: 0 auto;"> <a href="http://shecanquilt.ca" rel="nofollow" target="_blank"> <img src="https://blogger.googleusercontent.com/img/b/R29vZ2xl/AVvXsEgKi12IVPEO3zImQIcRBtYYDVGiwuI7eyNSwhdD4Bhl0fXNmhs6xbsFwa4aUK_Yt_ibatS4ykzKxQIXLFA0nl30MWhyqe-CBRa01_zG6PbpBenKIYG3bxVnRTzobM3THd0v0B7XYZhgUkGU/s1600/2017+FAL+BUTTON+300.jpg" alt="shecanquilt" width="150" height="150" /> </a> </div>

And if you have not yet done so, get your Q4 finishes posted, you can link up on my blog here or link on any of the global host blogs.

Best,

Leanne

Tuesday, January 3, 2017

Improv Circles - A 2016 FAL Tutorial


Today, as part of the 2016 FL Tutorial Series,  I am sharing a tutorial about how to make improv circles. There are, of course, many ways to improv a circle, this is just the way I have been exploring. 

You will see from the photos that I make an improv quarter circle and then trim it with a ruler into a nicely squared quarter circle block. Although the quarters do not line up perfectly, the squared up seams make the completion of the circle block easy and it gives a look I like. 


First, get a nice selection of fabrics handy. Making improv circles, and most any other improv work, requires you to be able to play with the colours as you go. I find that heading to my solids shelf gives me too many options, so I pick a selection of fabrics to have handy as I work.


Pick a starting fabric and freehand cut a quarter circle. In terms of size, you just have to eyeball it and you may find that your first couple of quarter circles are too small or too big or too "something". This is pretty normal for me when I start improv so I set aside, rather than ripping out or tossing out, those too "something" bits, as often, as I make more, those bits fit back into the work, often adding interesting differences. If not, toss them into the scrap bin for reuse later.

The other aspect of size is that if your block is getting too big, you can always trim it down. So just start with a size, you can see that my quarter circle start is about 5" on each of the straight sides. I am making large circles, each quarter section is about 12" square so the entire circles is a 24" square block. If you want smaller circles, just start with smaller bits.


If you were working with prints, this would matter so I am mentioning it. Put your first quarter circle cut on top of your next fabric, right sides both facing you so you can see them both. 


Cut the second colour, the first colour ring, along the edge of the quarter circle already cut. Then cut the outside of that ring. Bear in mind that about 1/4" on both sides of this ring will disappear in the seam allowance and chose your width accordingly.


I join the ring portion just as I join all circle and curve pieces. You can watch my just over 1 minute video here and read the related blog posts here and here.

Basically, I  lay out the pieces right side facing up.


I move them to my sewing machine and I turn them as shown. You can sew this curve with either piece on the top, but my preference is for the "pie" shape to be on the bottom.


Now take the top piece, in my case the "not pie shaped" piece and flip it right side down and match the starting points as shown. Given the nature of curves, and the fact that you will sew 1/4" inside the cut edge, there will be extra fabric at the end, so feel free to have extra of the top piece sticking out over the edge of the bottom piece.


Stitch 2 - 4 stitches and stop. Raise your presser foot and realign the pieces and then drop your presser foot.


This step is better illustrated in my video. You need to keep both pieces at the 1/4" mark on your presser foot as the go under the foot. Hold the top fabric up (this is important), but don't tug on it as you will stretch it on the bias. Keep your other hand (not photographed as it was holding the camera) on the bottom piece guiding it along the the 1/4" mark. Constantly adjust the placement of the top fabric so that it is meeting the bottom fabric at the 1/4" mark. Sew slowly and deliberately.


Improv circles will look a bit like this when done. 


I press each addition, pushing the seams to the centre.


In this photo you can see that a 1/4" seam allowance was achieved. It does not have to be perfect, but if it is too narrow, restitch so that the piecing does not come apart later as your quilt is used.


Add your next ring using the same method. Sewn piece is placed right side up on the next fabric which is also right side up. Cut your next ring.

You will see that you are also cutting left over chunks of the next fabric. Save those for other circles.


After a few rings, the piece might start to pucker. A trim of the edges usually takes that pucker out. I often trim after each ring is added as well. This is also a good time to adjust the size if your piece has become bigger than you wish it to be.


The last fabric is your background. I cut the square or rectangle of the background first and then, using the same method, I cut the curve for the background fabric.


It is the same approach to laying out the background piece for sewing. I line it up right sides up and then flip the top piece over to stitch.

Then trim your block on both edges that contain the improv. This photo shows the first cut and then I trimmed the bottom as well.

This is as far as I got with this new circle this afternoon. Once you have a full circle you can piece it together by sewing the four blocks together. Or you can keep the pieces separate until you have all the circles you want to create done which allows you to easily change the order of the quarters as the piece progresses.

I wanted to share some things. You can see that the quarter circle photographed for the tutorial, the first quarter - top left - is not so much curved in the centre as almost triangular. In part that happened because I did not cut a pronounced quarter circle and in part because the trimming cuts off the edges as you work. At first I wanted to toss out that quarter as being too triangular, but now I am liking its difference, so it is still on the design board. Don't be quick to judge any improv work, give it time before you edit it out.


Let me know if you have questions. And if you have not yet done so, get your Q4 finishes posted, you can link up on my blog here or link on any of the global host blogs.

Best,

Leanne