
After a bit of a break, Jess from Elven Garden Quilts and I are deciphering quilts again today. Jess will tell you all about how to identify a 16 patch block and I will share the math behind a 16 patch block and a quilt using 16 patch blocks.
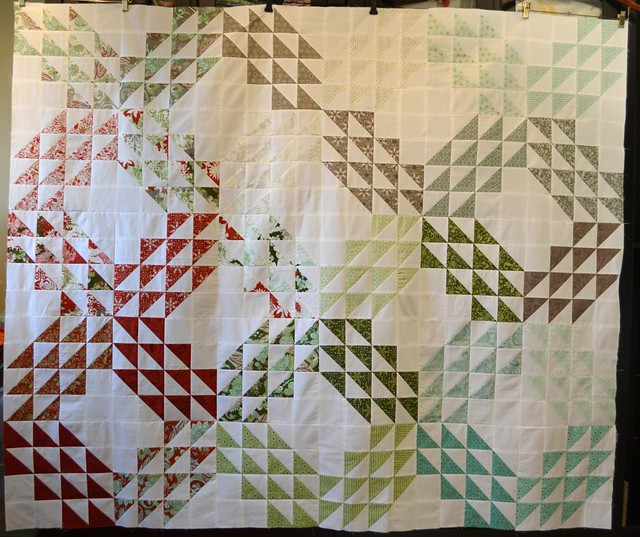
So you are looking a quilt top, you want to make one like it but don't know how to make it. Let's look at the quilt top above.
First, take a good look at the top. You can see big circles and also big Xs in the pattern. But if you take your eye to a corner and look for a while, you will see that the unique block that makes the pattern has 16 equal squares - that 16 patch repeats throughout the quilt.
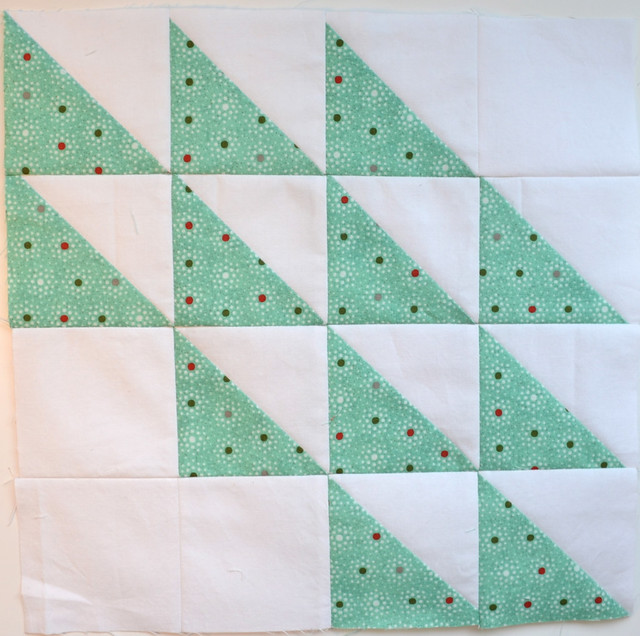
When you look at this block, you will see that it is made of background squares and then HSTs which are background fabric and feature fabric. This block is called Ocean Waves and is an old traditional block. You can refresh on making the HSTs from our earlier DYQ post here.
I hear some of you saying, "Wait a minute Leanne, how big do we make the 16 pieces of the block? Don't we need a pattern?"

The truth is you don't really need a pattern. You know that you want the block to be 16 equal sized squares, 4 across and 4 down. Given that quilters like easy math, a 16 patch is normally made to be a finished size that divides by 4. So the finished blocks will likely be finished at 4", 8", 12", 16", 20" or 24" block.
The pieces would be as follows:
- For a 4" finished block, each of the 16 units will finish at 1" (4" divided by 4 = 1"). Remember to add seam allowances of 1/2" per unit after we calculate the block dimensions - so you make 4 x 1.5" squares or HSTs (units) for the example block and then sew them together.
- For a 8" finished block, each of the 16 units will finish at 2" (8" divided by 4 = 2") - then add seam allowances of 1/2" and make each unit 2.5" and then sew them together in the order you need to make your 16 patch.
- For a 12" finished block, each of the 16 units will finish at 3" (12" divided by 4 = 3") - then add seam allowances of 1/2" and make each unit 3.5" and then sew them together in the order you need to make your 16 patch.
- For a 16" finished block, each of the 16 units will finish at 4" (16" divided by 4 = 4") - then add seam allowances of 1/2 and make each unit 4.5" and then sew them together in the order you need to make your 16 patch.
- For a 20" finished block, your units will finish at 5", for a 24" finished block, your units will finish at 6", and so on. You could make a huge single block to be the whole quilt if you wanted to do so.
But, again I hear one of you with another question: How will we know what size block to make to get a quilt like yours?
One way to figure out the block size is to take the size of the quilt top and work backwards to the block size.
For example, if you read in my description of my quilt top that it is 72" x 60", then:
A popular 16 patch quilt on the internet is the St. Louis 16 patch. The clever tutorial for making these quilts quickly is over at Sew with Sass here.
If you are looking for another 16 patch tutorial, you can check out the Ocean Waves tutorial on my blog here.
As always, if you have any questions on this post - it is about math after all - just leave them in the comments or email me at shecanquilt [at] gmail [dot] com.
I hope you will head over to read Jess's post at Elven Garden Quilts, which will help you to identify more 16 patch blocks. Next time on Decipher Your Quilt we will be deciphering 25 patch blocks.
By the way, I am home from Sew Down Nashville and I had the best time. I hope to get my pictures sorted so I can tell you all about it tomorrow.
Best,
Leanne
- Look at the quilt top and count the number of blocks. For this quilt we see 6 blocks across and 5 blocks tall.
- Take the longer side measurement and divide it by the larger number of blocks: 72" divided by 6 = 12.
- Take the shorter side measurement and divide it by the smaller number of blocks: 60" divided by 5 = 12.
- To make a quilt top like mine, you need to make blocks that finish at 12"
Another option is to make the blocks a size that is pleasing to you and then make enough blocks to get the size quilt you want.
For example, if you want a quilt that is 100" x 120" and uses large blocks:
- A nice oversize block is a 20" finished block (don't forget, you will be making the block to be 20.5" unfinished, but this math uses the finished block sizes). Make one block to see if you like its look.
- So if you liked that 20" block, then to make your quilt you need 100" divided by 20" = 5 blocks on one side. The other side is 120" divided by 20" = 6
- For your quilt, you will need 5 blocks across and 6 blocks down. That means 5 multiplied by 6 blocks = 30 blocks in total.
You can use this math to make quilts of any size. However, again quilters tend to avoid difficult math, so use the number of blocks to reach close to your desired size. For example, if you want to use 12" blocks and want a quilt that is 100" by 120", the math is:
- 120 divided by 12 = 10 blocks on one side.
- 100 divided by 12 = 8.33 - so instead either finish this side to 108", which is 108" divided by 12 = 9 blocks on this side, or finish this side to 96", which is 96 divided by 12 = 8 blocks on this side.
A popular 16 patch quilt on the internet is the St. Louis 16 patch. The clever tutorial for making these quilts quickly is over at Sew with Sass here.
If you are looking for another 16 patch tutorial, you can check out the Ocean Waves tutorial on my blog here.
As always, if you have any questions on this post - it is about math after all - just leave them in the comments or email me at shecanquilt [at] gmail [dot] com.
I hope you will head over to read Jess's post at Elven Garden Quilts, which will help you to identify more 16 patch blocks. Next time on Decipher Your Quilt we will be deciphering 25 patch blocks.
By the way, I am home from Sew Down Nashville and I had the best time. I hope to get my pictures sorted so I can tell you all about it tomorrow.
Best,
Leanne
16 comments:
Another fab post, thanks Leanne! Im still working on my DYQ inspired *two* patch quilts! It'll bw a while before i need to get my head round 16 patch blocks!
Being able to look at a quilt and see the block is such fun. Then breaking it down into its components. I love the planning stage.
The first quilt top is wonderful!
Like that block and I see I need to get scrappy done first!
Very interesting....I have pieces of paper all over my studio with calculations such as this! ;-)
That is great information. Many thanks!
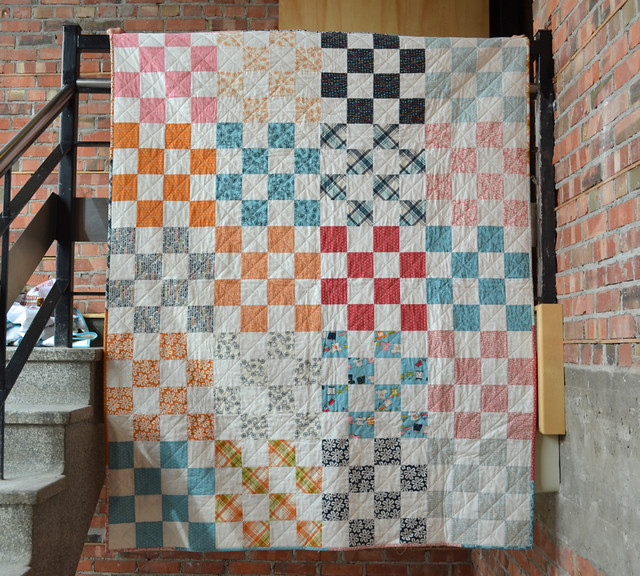
Any idea what the background off-white fabric is on the quilt hanging over the metal railing by the brick wall? Pretty! Thanks for sharing.
Oh I do love a good divide and multiply :oD
Excellent post as always Leanne!
thank you this item full of interesting info for making a block
All lovely and clear!
All of these posts are well written. You're both doing a great job covering so many basic quilting concepts.
I love a bit (well, a lot!) of quilt maths!
great - thank you!
Great post thanks Leanne! I always thought maths was a subject I wasn't strong in until I started quilting. But as a quilter (who doesn't ever use patterns) it's very necessary. I love being able to look at something and work out how to make it without a pattern. So pleased you had a great time away and look forward to seeing more pics xx
Catching up on blog reading, and I have to tell you I love the new look of your blog! Fabulous!
Post a Comment