Thursday, May 8, 2014

Decipher Your Quilt - Why would you call that a 16 or a 25 patch?


We have had some great questions in the last couple of posts of Decipher Your Quilt, so today Jess, Elven Garden Quilts, and I are going to focus providing a bit of clarification - a sort of Dear Jess and Leanne type post.

First I wanted to remind you what we are doing in this series. Our focus is to give you the concepts and information we use to allow us to figure out how to make quilt blocks without a pattern or tutorial. We are sharing how to decipher your quilt.

In that process, we have to have some working definitions and as I mentioned at the beginning of the series, these are just our ideas and approaches. We are not the quilt police nor are we authorities on quilting; we are just pretty good at geometry and basic math. Interestingly as we start to talk about more complicated blocks like 16 and 25 patches, it becomes clear that there are many ways in the quilting world to define or refer to these blocks. And when the blocks become complex there are even more differences.


For example, let's look at the block above. Jess calls this block Another Star. EQ7 calls it Girl's Favourite. When you look at it, you might see a bottom row of the white square, the star points with the fancy orange block and the white square. Then a middle row of the large white square with the yellow corners and the same star points and fancy orange block just turned 90 degrees, then the top row which is a mirror of the bottom row.

The problem is that without more you cannot easily make this block without a pattern. You don't know how big that thicker middle bit is compared the the bottom and the top row. You will not know the measurements of the pieces to end up with a 12" finished block, for example.


But, if I lay over it a 16 patch grid of equal size squares, I now recognize this block as a 16 patch. I can figure out the sizes of units within the block to make that 12" finished block - each square in the 16 patch would need to finish at 3" on each side (12" divided by 4 = 3).

Once I know that each grid square is 3" finished, I can see that the centre 4 squares will join together to be a 6" square. I can piece that part as 4 HSTs or I could instead piece it as a square with yellow corners added.

The same goes for the star point parts. I could piece each square in the 16 patch grid (do you see how those squares are quarter square triangles) or I could piece that part differently so that the orange square can remain as an unbroken square of fabric. Both will give a similar but slightly different looking result.

The trick to being able to decipher it - that is to figure out the measurements you need to allow you to piece the block -  is the same no matter how you decide to piece the block in the end.


One more example. That quilt above is made up of 25 patch shoo fly blocks. Now when I piece this block, I piece it in 9 pieces, like a nine patch. But when I decipher it and calculate my sizes I am "seeing" the 25 patch grid superimposed on the block.

If you imagine a 25 square grid over the block you will see that the corner HST units are made of 4 blocks each of the 25 square grid, the long white middle sashings are made up of 2 squares on the grid, the centre square is made of one square on the grid. Although the block certainly looks like a 9 patch, and I would construct it in 9 pieces, I calculate it as a 25 patch.


So if I want these shoo fly blocks to be 10" finished blocks, I will know that the centre square will be  2" square. The white sashing will finish at 2" wide by 4" long. The corner HST units need to finish at 4" squares.

I am not likely going to make these blocks to be 12" as the math is harder because it is a 25 patch. It is harder to divide 25 by 12 and then cut and use fabric pieces that size, but I could easily make the blocks to finish at 5" or 15". Compare that to a 9 patch block which easily finishes at 6", 12" or 18", but not 5", 10 or 15".

The take away point is that the approach you might take to construct the block will often not be the approach you take to decipher the geometry and the math in the block. Jess is explaining this same concept today on her blog, Elven Garden, Quilts, you will want to read her explanation too. Let me know if you have questions.

We will be back in two weeks to decipher odd-ball blocks.

Best,

Leanne

Sunday, May 4, 2014

AYOLF May goal

Modern Stitching Bee top

So far this year, the monthly goal setting for A Year Of Lovely Finishes has been very helpful for me actually getting things finished. I figured out that picking a FAL goal will also keep me moving along with that list too.

So this month my goal is to finish this thrift - also known more as the economy block - quilt. Many of the blocks were made for me by my friends in the Modern Stitching Bee but I got stuck when I was unsure if I should change the edge rows I had made. I'm over that, they are staying as they are and I am going to get a nice back made and put it on the long arm to quilt.


In case you were wondering, we had some snow last night, seriously. Oh well, all the more reason to quilt today and no chance to clean up the back garden. I am off to link up with the AYOLF group and to check out what others are up to this month.

Best,

Leanne

Saturday, May 3, 2014

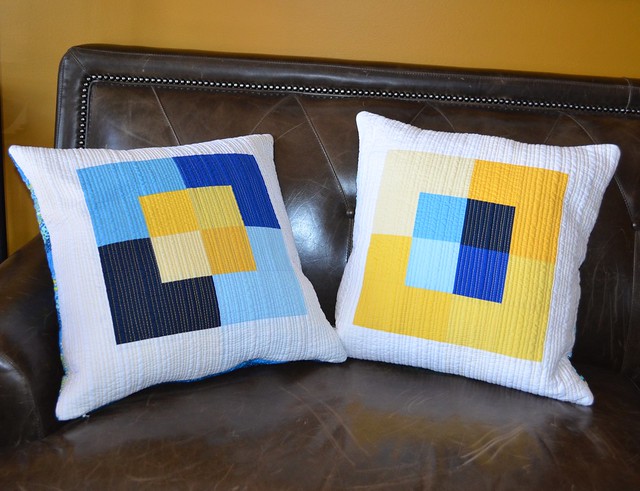
Some pillows from my pattern - Canvas

Canvas - pillows from my quilt pattern

I finished these pillows last week. In fact I took some photos of the installation of their invisible zippers to complete the tutorial I wrote about my spring pillows, which is here.

These pillows were made using my new pattern, which I have called Canvas - you have already seen several versions of quilts made with this pattern here already: Radiant Orchid Colour Study, Earth, and Rebel. As I've said before, this pattern was inspired by Josep Albers who did many colour study paintings.

Canvas

The same blue and yellow solids are in each pillow. And then I used blue and yellow threads to quilt them heavily but not quite at matchstick levels. I love how the colours look different depending on which one there is more of and which ones the colour touches.

Canvas

They both have invisible zippers, the tutorial to do that is here. Invisible zippers are fast and simple to install. Truly they are.

Canvas - back

I gave myself permission to cut into some favourite Amy Butler prints for the backs. The pillows are about 20" square so the backs take up a good part of a yard of fabric, but it was not doing anything fun on the shelf.

Canvas

They look really interesting on pointe too. These are also for my guy, he was feeling the need for better back support when he reads on the bed. They are filled with nice plump down filled pillow inserts from IKEA.

Canvas

I spent the better part of today finishing the pattern, at least well enough for my pattern testers to have a go at it. Canvas is sized to make this pattern from mug rug to large king. I am looking forward to getting it in the shops for sale but first I need some feedback from the testers. I'll keep you posted as to when it is actually ready for purchase.

Canvas

It takes a village for me to make a pattern it seems. Before my wonderful testers even got their copies of the pattern, the lovely Kat (Flutter Kat) worked on the lovely logo and branding bits, the ubber talented Kerry (PennyDog Patchwork) made the first set of graphics from scribbles on a paper and carefully taught me how to make more myself, and the fantastic Lynne (Lily's Quilts) sharpened her pencil, checked all the math and edited the pattern. I am so grateful to all of these talented women, who, by the way, are each open to being retained to assist others at very reasonable rates too.

Finish Along 2014

I almost forgot to mention that these pillows were on my Q2 FAL list, so this finish makes 2 finishes of 12 on the list, which is better than none for sure.

I am so enjoying a whole weekend off and at home, tomorrow I am hoping to do some quilting with the long arm. I have a week after that in town and then I am off to Quilt Market in Pittsburg with Katy, it seems I have been granted a credential as an industry professional, I'm so excited.

Leanne


Thursday, May 1, 2014

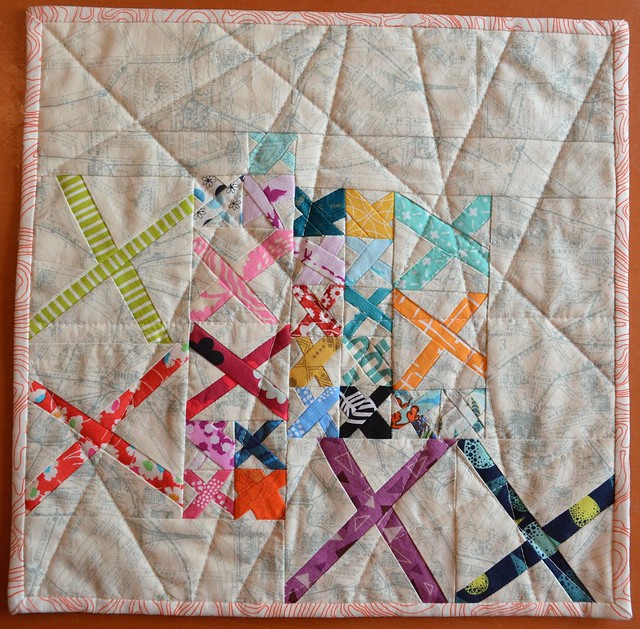
Landmarks - Ta Da!

Landmarks

Landmarks is a 12" square mini quilt. I participate in the Four in Art group and this quarter our theme was urban landmarks. I kept thinking, I use landmarks to find my way to a place, another landmark. You know, X marks the spot.

Then I was reading about Thomas Knauer's wonderful quilt, You Are Here (from his book Modern Quilt Perspectives, which I highly recommend) and it is also about being at a spot, being grounded and uses the X motif. I was very much inspired by his quilt and concept, in fact so much so that I almost did not go with the idea at all because I wanted to do my "own" thing.

Landmarks

As usual, I found myself putting this project off. I did not want to make an impression of an actual landmark. I wanted to do something improv. In the end, I returned to the Xs.

Landmarks

You can see that some of the improv Xs are small, they finish at 1".

Landmarks in progress

I started a couple of nights ago, making tiny one inch Xs. I just grabbed scraps from my nearest pile with some of the Paris map fabric I still have. (People have asked me about this fabric, it is out of print as far as I know. It is a 3 Sister's design.)

Landmarks in progress

My friends on Instagram loved them, and my fancy nails (the polish is here at Soak). But I realized to make a 12" square I would need 12 x 12 or 144 tiny Xs. There just was not time. I really need to get to work sooner on these challenges. So I made bigger Xs and finished her last night.

Landmarks

I played around with placing my blocks. This arrangement felt right - an urban environment with plenty of landmarks, big and small, mushed together, with more at the centre, less at the edges. I wondered if this quilt should be called "lost", or "where am I" or "where are you". But the fabrics are too bright and happy for an angsty quilt, I will make that one another time.

Landmarks - back

In keeping with the urban theme, I used a Carolyn Friedlander topographical print to back and bind her. The quilting is minimal, random lines, a walk through the city landmarks. I used a single fold binding, which I much prefer for small quilts.

Landmarks

I see this quilt as more of an ariel view, so I am not sure which side is up. I like this orientation as well as the one at the beginning of the post.

I have to say that I love the feel of the cheerful scrappy improv Xs in this quilt. Now I want a bigger one - I think this would be a fun lap size quilt, maybe even king size, we shall see. Despite all my ambivalence to this project, the challenge and the push to just get it done has, again, been very good for me creatively.

The other members of the Four in Art group are posting their quilts inspired by the theme urban landmarks today too. They are a talented bunch, do go and have a look:

Amanda  at whatthebobbin.com
Betty at a Flickr site: http://www.flickr.com/photos/toot2
Elizabeth at opquilt.com
Rachel at rachel-thelifeofriley.blogspot.com

Best,


Leanne

Decipher Your Quilt - finding the 25 patch block


Today I am sharing with you a few 25 patch blocks and how to see them in a quilt and Jess from Elven Garden Quilts is explaining the math behind blocks like these.


A 25 patch block is block that is made up of a 5 x 5 grid. All the blocks in the sampler, above, are 25 patch blocks. If you look carefully, you can see how each of the units in the block is part of the 25 block grid.


In a quilt made of 25 patch blocks it might be hard to see the actual block. For this quilt, I turned off the feature of EQ7 (which I am just learning, having just bought the new version for my Mac) that records the block squares because if you pieced this quilt it might be hard to see the pieced white squares. When you look at this quilt, at first you don't see the 25 patch - it is called Odd Scraps. To see the block that repeats, you need to go to the left or right hand corner of the quilt and look until you can pick out the parts of the quilt that repeat.

DSC_0790

I pieced this block that will finish at 15". I think when I am ready to make a lot of hsts, this block is on the list.


On this photo I left the grid rulers on, which makes it a little easier to see the Album Block in this quilt.


This one really appealed to me. The block is called Providence, and is a old block designed by Nancy Cabot. Do you see how the secondary star that is not part of the block, it is a secondary pattern caused by putting the blocks together.

DSC_0791

Next time I make this block I am going to put contrasting fabrics in the middle, but it is also a block I would like to make more of.

There are lots of 25 patch blocks, but less than there are of 16 and 36 patch blocks. The fact that the 25 patch bock only divides by 5 makes harder to do the math for, and harder to fit into quilts with other blocks not based on a measurement using 5, and my guess is that discourages many quilters from using them.

Jess at Elven Garden Quilts is explaining the math behind making these 25 patch blocks, don't forget to go over to her blog and read her post. If you make some  blocks or quilts using what you learn in Decipher Your Quilt, please share the with us in our flickr group. Let me know if you have any questions.

Best,

Leanne