Wednesday, July 3, 2013

Elizabeth's Faced Binding - a 2013 FAL Tutorial

she can quilt


My friend Elizabeth, who blogs at OP Quilt, has agreed to share a tutorial for a faced binding with us. This is a binding which makes your quilt look like a piece of art where the canvas is all you see on the front. Elizabeth gives us simple and straightforward instructions for this advanced quilting technique.

I am happy to be a guest on Leanne's blog She Can Quilt today, presenting a tutorial for a faced binding for the Finish-A-Long Tutorial series for Q2. 
FacedBindingTitle 
A faced binding is applied to the front of your quilt and is wrapped to the back.  If done well, it can't be seen at all from the front, allowing the last border of your quilt to act as the frame for your quilt, and eliminating one last design element from your quilt.  Often used on art quilts, when an additional line of a border would distract from the art, it can be also be used on our regular quilts.

Kaleidoscope Top
I used it on Kaleidoscope, as the printed border needed no other embellishment.

Step One: Prepare the quilt and strips
Trim the batting and edges of your quilt.  In the best world, your trimmed line falls at the edge of your fabric.  A little fudging here and there is okay.

For the binding, you'll need four strips, one for each edge.  Measure the edges of your quilt and add 10 extra inches to that measurement.
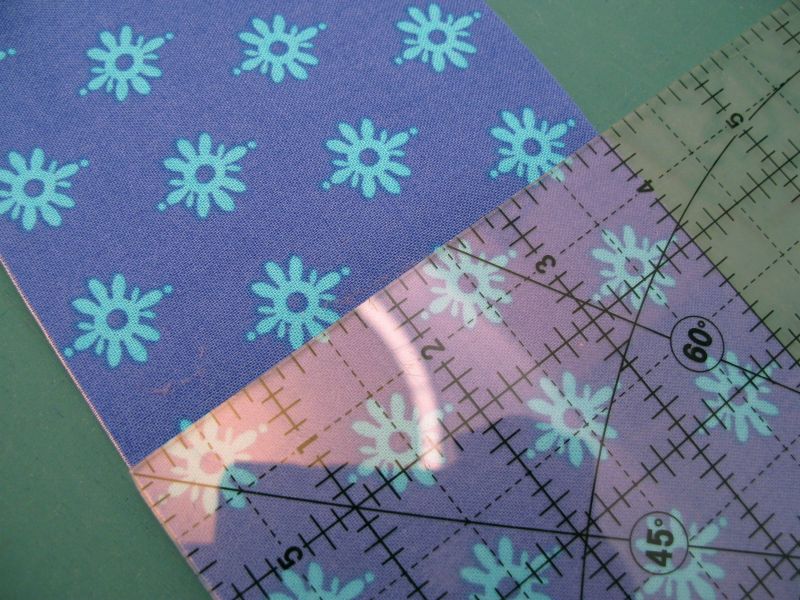
Cutting

Cut 4" wide strips for a medium- or large-sized quilt, and 3" wide strips for smaller quilts.
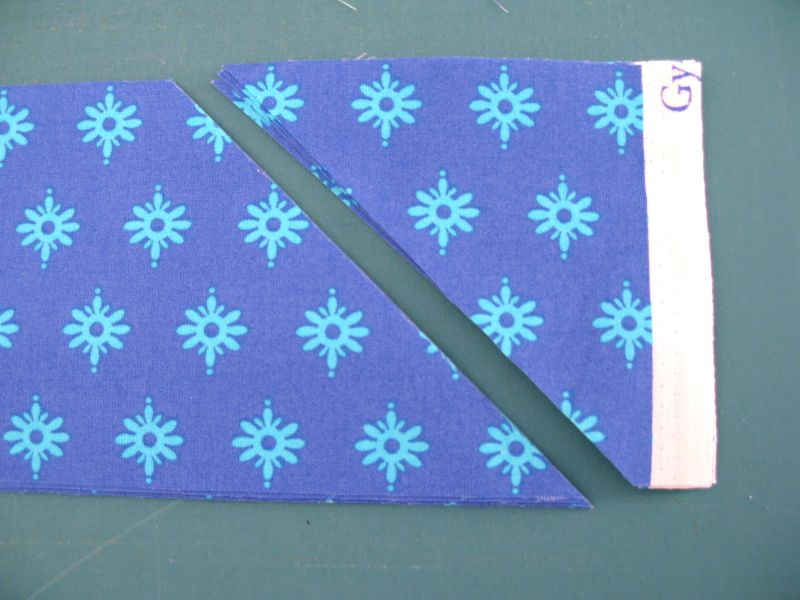
Trim Ends

If you need to piece the strip to provide the right length, trim both ends at a right angle (make sure they are slanted the same way) and piece together on the bias.  Fold the strip in half lengthwise and iron.

Step Two: Applying Binding Strips
Leaving a tail on each side of about 5 inches, pin the binding strip to the FRONT of your quilt, raw edges even, with the folded edge of the binding falling toward the quilt center, just like you would for a regular binding. Only this binding is giant-sized, and you won't stitch around the corners continuously.
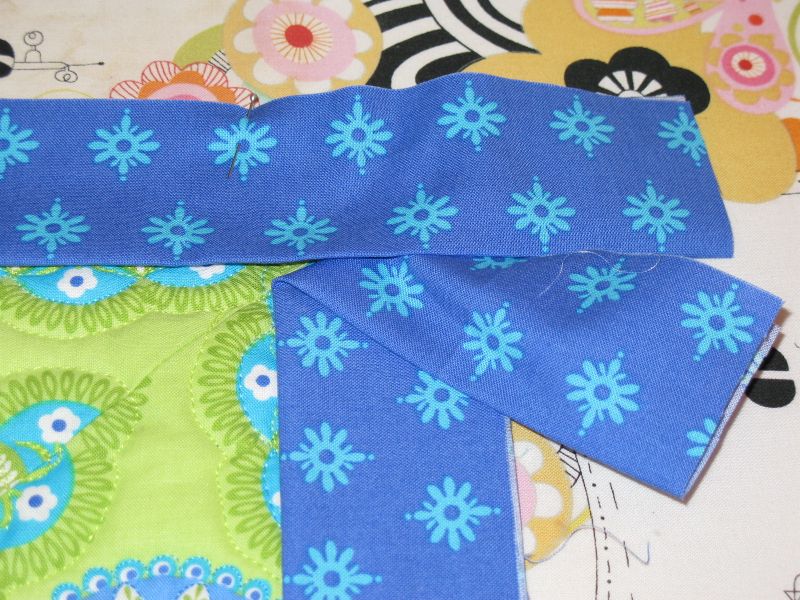
Pinned Binding

Continue pinning the strips onto each side.  Pin the strip nearly to the end, as you'll be leaving the last one-quarter-inch of each seam unsewn.
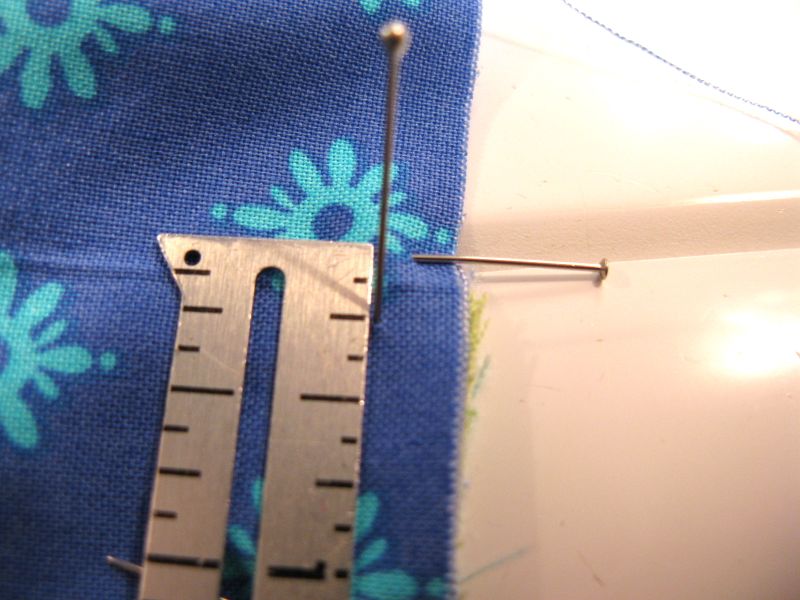
QuarterInch from Corner

I measured one-quarter-inch from each edge, and placed a pin there to remind me to stop sewing.
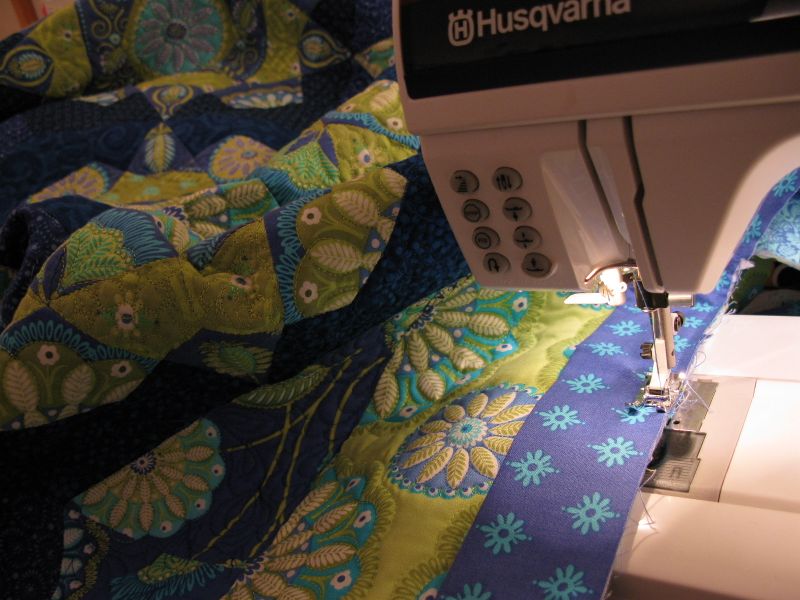
Stitching Binding

Stitch on the binding, using a quarter-inch seam allowance.

Step Three: Mitering the Corner
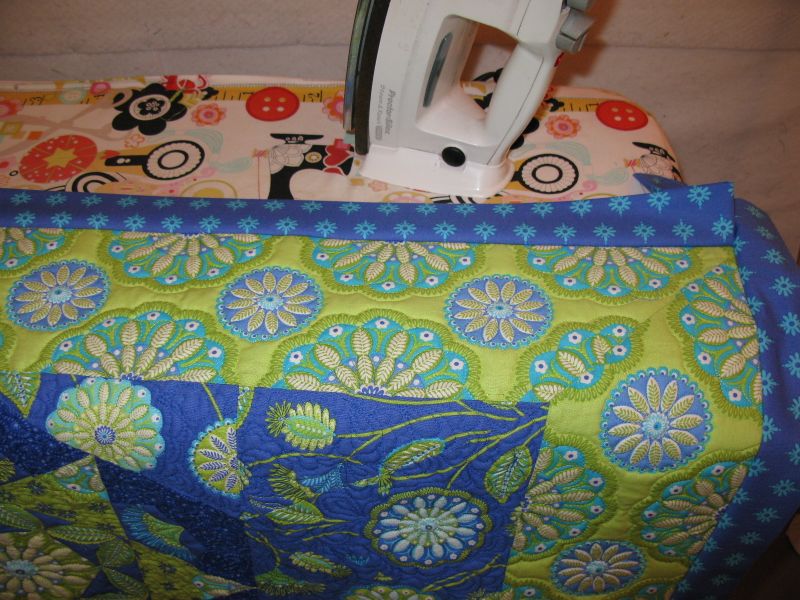
Pressing

Take the quilt to your ironing board and using a light touch, press the binding strips away from your quilt.

Mitered Corner2

Then lay the quilt so you can fold back the binding tails, as shown.  Work to have a perfectly straight 45-degree angle on those folds where they meet; use a ruler to help you align it, if necessary. Press.  The slight gap you see there between the folds is normal--the folds relax when you take the iron off.  It's better to have a slight gap than to have an overlap.
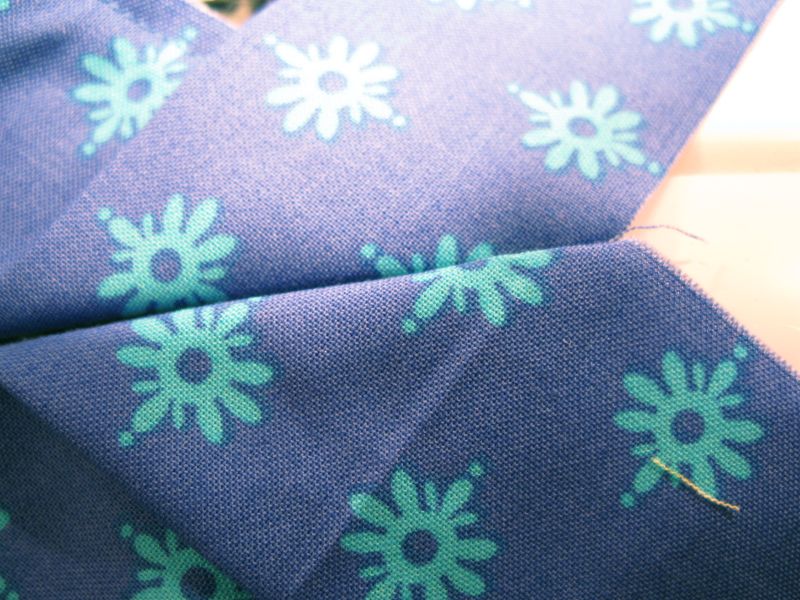
Mitered corner1

Another view, but this is just fingerpressed.  While you can just fingerpress the folds, I think it's better to get a hot iron on there so you can see the crease.  (See next image.)  Remember that you are pressing through double-folded fabric.

Unfold and align the binding strips for the first corner, folding the quilt down and out of the way.  You are lining up the top folded edges.  I try not to pin this next seam to death, instead using only three pins:
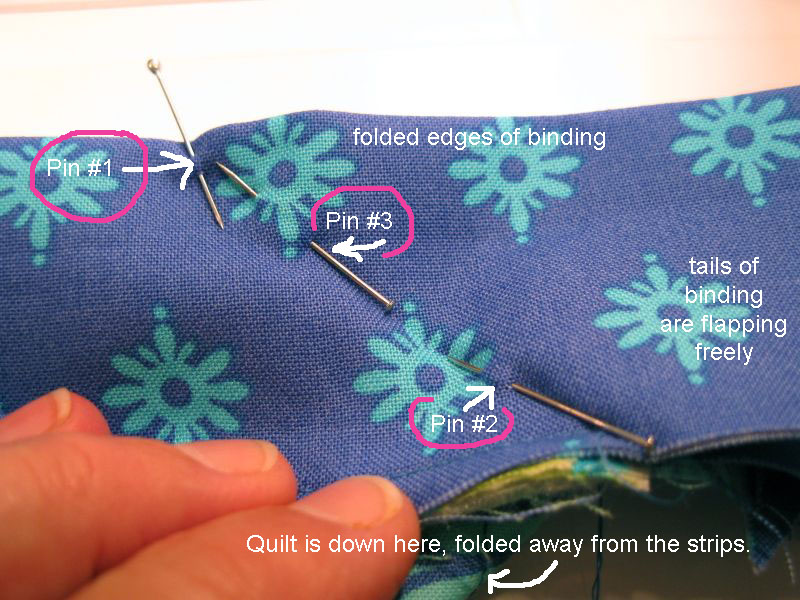
Mitered corner3a

• #1--Place a pin at the outer, folded edges of each binding strip and line the creases up.
• #2--Then go to the bottom, near where it's joined to the quilt, and poke a pin from the top crease down into the bottom crease, lining them up.
• #3--Lastly, line up the creases at the center and place a pin there.
You are pinning along the crease you made when you ironed in that beautiful miter at the ironing board.

Stitch the seam.  You'll begin stitching from the folded, outer edges and sew back towards the quilt-binding seam (at the bottom of the picture).  There's really no need to "tack" by backstitching.  So don't.  Just leave your thread tails long and you should be fine.
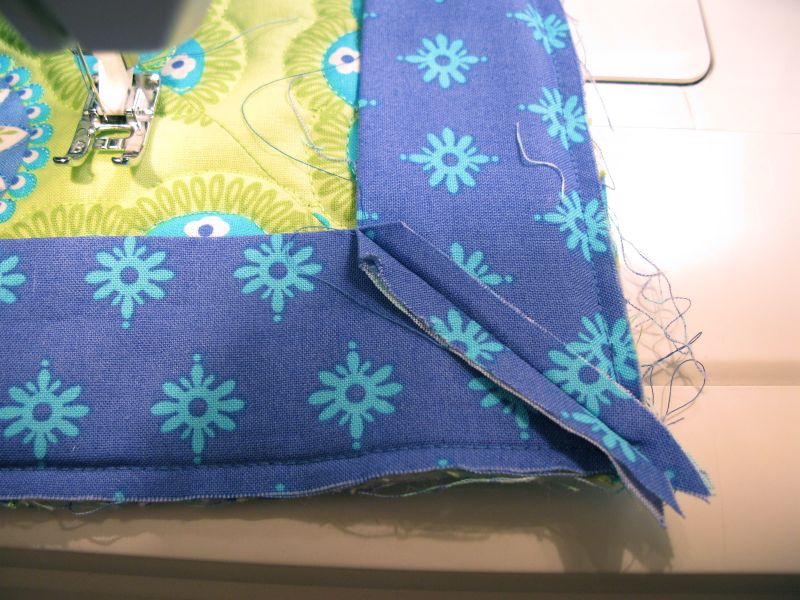
Mitered Corner 4

Trim the tails to one-quarter-inch, as shown, then press the seam open.
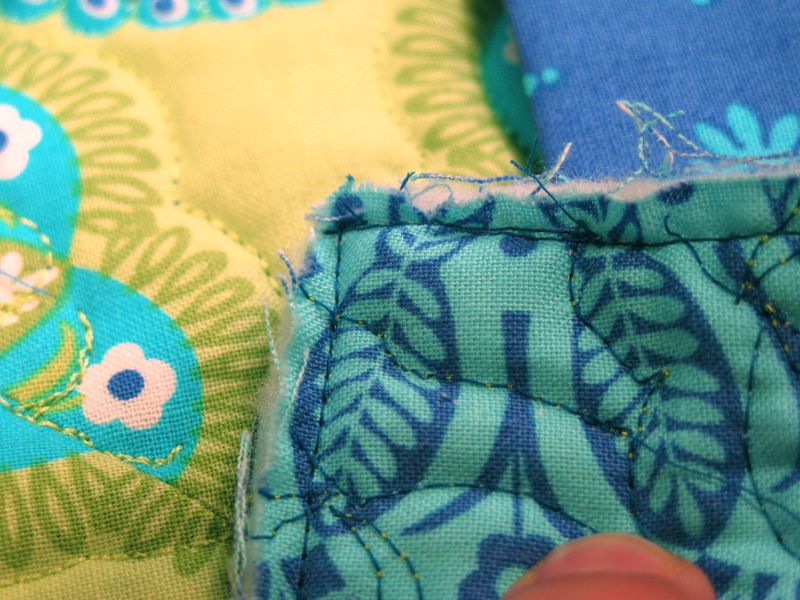
TrimCorner

This is the backside of that mitered join up above.  Notice how the seam allowances become smaller at the point?  That's because I trimmed them down to eliminate bulk.  Trim out as much of the batting as you can, while making sure you don't cut the stitching. Don't skip this step.  Just proceed carefully.  (You will be fine.)

Step Four: Understitching 
Often used when attached a facing to a neckline in dress-making, understitching is a technique to join the weensy seam allowances to the faced binding, which will keep them from rolling to the front and showing on your quilt.
First, since you pressed the binding away from the quilt up above, you've already started on this step.  If you didn't press at that time, do your best to press it now, going as far into the corner as your iron will allow.
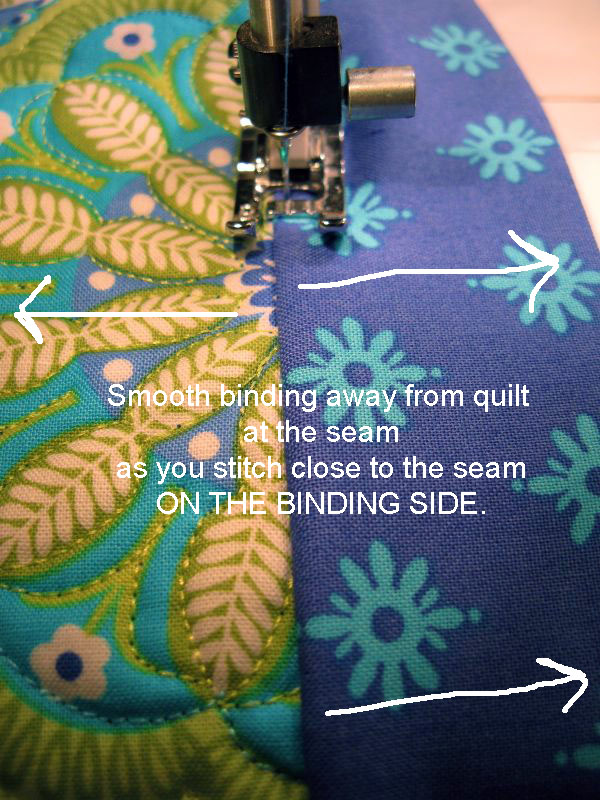
Understitching

Line up your needle so you are just to the right of the binding seam.  Stitch a straight line, smoothing the binding and the quilt away from the seam as you go, keeping a light tension.  Light.  The success of understitching depends on not letting the binding bunch up toward the quilt, nor wandering in your stitching onto the quilt.  Stay on the binding, smooth away the  binding and it will go as smooth as butter.
Of course you can't sew deep into the corner, so go as far as you can and leave the thread tails long.  Cut the thread, then begin again on the next side.  You're almost there.

Step Five: Sewing down the Binding
Carefully turn the binding to the back of your quilt, and gently ease out the corners.  If you are brave and not foolhardy, you can use a chopstick to help ease out the tip.  But if you go too far, you'll have a mess on your hands. Proceed gingerly.  Give it a quick, light press, helping the binding roll to the back, if necessary.  Using steam and a little pressure from your fingers should train your quilt nicely.

If after turning, you think your corners are distorted and look like the tips of a witch's shoe, a little pulling at the side edges, just below the tip, will shorten that tip and bring it back into shape.  Set it with a little shot of steam from your iron, then press it with your fingers or a piece of wood until it cools.  Seamstresses use "clappers," or smoothed wooden tools just for this purpose.  However, it's better to lay a piece of cloth down and put your tender fingers on that, than to smash the heck out of it with a hot iron.  Never over-iron your quilts, or blocks, for that matter!  A horribly flattened block means that, to me, someone has decided to start wearing out their quilts early.
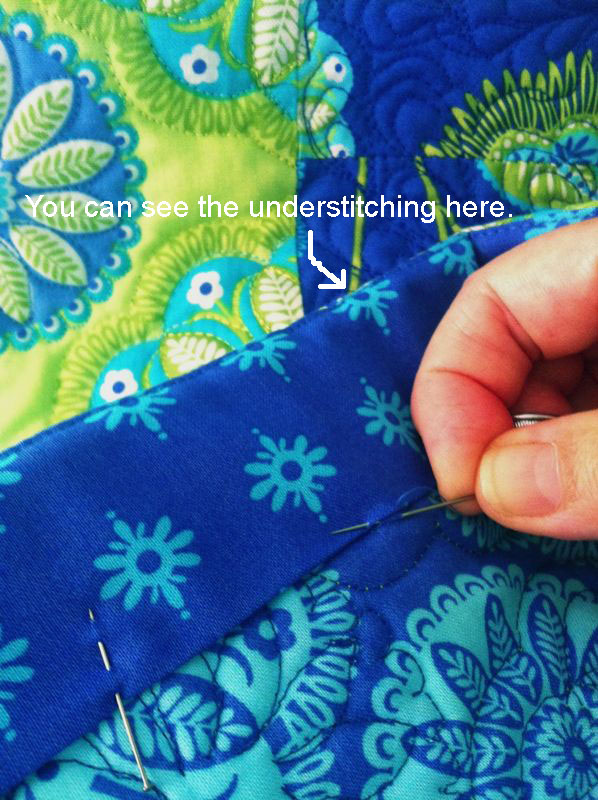

Stitching Down Binding

You'll stitch the binding down by hand, just as you do a regular quilt binding.  Now you can clip those long thread tails on the top of the binding as you come to them.  Tuck the long tails that are on the backside of the binding up inside--no need to trim those.  If you find your miter is buckling just a little and has too much fabric, with your handsewing needle take a small tuck and secure it with tiny stitches.
All done!


Here's a close-up of the quilt above, showing how a faced binding is invisible from the front.


This is the faced binding from the back of the quilt.

Note: If you need to attach a quilt sleeve for hanging, you'll create your tube of fabric and stitch it on now, aligning the top edge 1/2" to 3/4" down from the top, and leaving a slight bulge in the sleeve to leave room for the hanging rod.

And thank you Elizabeth!

Don't forget to link up your Q2 finishes - the Q2 post-quarter link is open and it will close at midnight MST, July 7, 2013. And if you still have some UFOs I hope you will join us for Q3 of the FAL, Q3 FAL lists can be posted starting on July 8.

Tuesday, July 2, 2013

Karen's Baby Ribbon Blankies - a 2013 FAL tutorial

s
she can quilt

Today Karen, who blogs at Quilty Creations, is sharing her tutorial for the cutest baby toy. This adorable project will sew up in no time at all, and is a perfect baby gift. You can make one to match a quilt you are giving, or make a set in different fabrics and colours. I am putting this on my quick gift list, I expect you will too.


Hi, I'm Karen and I blog at Quilty Creations. I have been sewing and quilting for about 3 years, ever since my lovely husband bought me a sewing machine for Christmas! Today I'm pleased to share my tutorial with you on how to make a Baby Ribbon Blankie. 

I used minky fabric for these as it is super soft and snuggly for baby. These blankets are really quick and easy to make and, as well as being a comforter for baby, they also aid hand/eye coordination as baby develops and tries to reach out and touch the ribbons.


These blankies are also great for babies and children with sensory disabilities as you can make them with all sorts of textured ribbons, ric rac, or even string for them to feel and touch.

You will need:

2 squares of minky fabric, 10" x 10"
12 pieces of ribbon, each 6" long.


I have used 3 colour co-ordinating ribbons but you can use 12 totally different ones if you like. I recommend using the walking foot on your machine as minky fabric is thicker to sew through, especially with the two layers together. Let's begin!

Lay one square of minky fabric right side up. Take one of your ribbons and fold over in half and  lay it on top of the minky fabric, about 1.5" from the top along the right hand edge. Make sure about 0.5" of the raw edge of the ribbon overhangs the minky fabric.


Pin it and stitch in place a quarter inch from the edge of the fabric, over sewing several times to make sure it is well sewed down and secure for baby.


Continue to sew one of each ribbon along each side of the minky square, ensuring they are evenly spaced.


Once all your ribbons have been attached, snip off the overhanging raw edges of the ribbons in line with the edge of your fabric.


Lay you other square of minky fabric on the table, right side facing up. Lay your square with the ribbons attached, right side facing down, making sure that all the ribbons are laying nice and flat inside. Pin in place - minky can be a little stretchy and slipper at times!

Now we are going to sew nearly all the way around the fabric, leaving an opening to be used as a turning hole.


When you sew past a ribbon, make sure that you are just inside the stitches already there, this way  they will be hidden inside the blankie and will not show up later.


When you get to within a quarter inch of the corner stop in the needle down position, raise your machine foot and turn your fabric around so that you can continue to sew along the next side, lover the machine foot and carry on sewing.


Once you have reached your sewing stop point, remembering to leave that open hole for turning, back stitch to secure your stitching, remove all your pins and clip your corners.


Now turn the blankie through the turning hole.


Get your finger right into the corners to push them out as far as they will go. Put your finger in each ribbon loop and give it a good tug at this point to make sure it is nice and secure. 


Now topstitch all the way around the edge of your blankie 1/8" from the edge (or as close as you are comfortable with). As you do this you will be closing your turning hole, so as you go over the turning hole make sure that the edges are folded under neatly in line with the rest of the seams.


And you're done. You've made a lovely soft Baby Minky Ribbon Blankie! Minky is available in a variety of colours and patterns, as you can see from this selection that I have made.

 Thanks so much for taking the time to look at my tutorial and please get in touch if you hav any questions. If you make any blankies using my tutorial please be sure to add  your photos to my Flickr group, I'd love to see them! And thank you to Leanne for letting me take part.

And thank you Karen!

Don't forget to link up your Q2 finishes - the Q2 post-quarter link is open and it will close at midnight MST, July 7, 2013. And if you still have some UFOs I hope you will join us for Q3 of the FAL, Q3 FAL lists can be posted starting on July 8.

Monday, July 1, 2013

I have a little news to sneak in between the FAL tutorials


There are a few things for me to tell you so I am sneaking this tiny post in between the FAL tutorial series. 

First, I got to be a part of that quilt, Circle of Friends, an amazing quilting project for Cindy and Brian who are very special friends, with contributions from more of my friends from 4 continents and many countries. You can read about it at Susan's blog Canadian Abroad here

Susan was so busy writing about everyone else that she forgot to mention how wonder she was to organize, quilt, embroider, bind and post this special project. She is the best and I am so proud to be her friend. 

DSC_0269

Next, the second set of baby robins were hatching as we returned today. They are in the "alien" stage. I will document and post more pictures as the mommy robin allows. This time I get to be here instead of imposing on my photo correspondents.

DSC_0228

The eldest son's wedding was wonderful, not a glitch or a hiccup. Thank you all for your well wishes. The ceremony was at this spot, which is high on Mount Lady MacDonald overlooking Canmore, Alberta and beautiful Mount Rundle. Despite flood damage and no drinkable water, the folks of Canmore  were happy to have us all arrive and they made sure that we all had the best time.

We are all home now, tired and heading to sleep soon. Tomorrow there is work and laundry and more FAL tutorials too. Oh and I hope to finally, finally get in some actual sewing too.

Happy Canada Day!

Best,

Leanne

Rhonda's QiTG NeedleCase 2.0 - a 2013 FAL Tutorial

she can quilt


The Q2 2013 FAL tutorial series kicks off with a really handy tutorial from our Finish-A-Long founder, Rhonda from Quilter in the Gap. When she told me she was making a needle holder, I did not realize it was a holder to keep track of needles by size and kind. I know you will enjoy this clever and useful little tutorial. I plan to make one of these needle cases right away and I am guessing you might too. Read on.

QiTG NeedleCase 2.0
Sewing Machine Needle Storage

I have written a tutorial for two different versions of this NeedleCase. One is printed onto fabric from your printer and essentially the easiest and the other is all hand drawn and written. They both look the same in the end (depending on the closure of your choice) but the fabric requirements are slightly different for the two, so I am going to treat them differently.

BTW - because I am sure you are wondering what is up with 2.0 (other than I like being different), clarity will come at the end of this post!

These are both great projects to use up those scraps we all have hoarded up laying around, so make several of each kind, keep your favorite, and gift the rest!
  

 Tutorial for the Hand Drawn version:


Materials:

         10” square white fabric
         10” square print fabric of choice
         10” square batting (any kind)
         (2) 12” pieces ribbon or (1) 12” piece ribbon & 1 large shank button
         Removable fabric marker (I prefer friXion pens)
         Permanent marker (I used Sharpie)
         Thread of choice

Instructions:

1.       With removable marker, draw a line 1” in from each edge on the white fabric square. Then from the bottom line, draw nine lines ¾” apart (not counting the bottom line). Then from the right hand line, draw six lines 1” apart (not counting the right hand line). This creates your grid and should look like this:

2.       Lay your marked white fabric square on your batting.
3.       Stitch on all the above printed lines – through batting & fabric. Be sure to use a thread color that is visible against the white fabric. Remove marks (according to directions of marker choice). This completed step will look similar to previous step if using black thread & black removable pen…

4.       This is the point where you label your grid using the permanent marker. You can get as detailed as you choose. On one of mine, I went simple with size at the top & type on the left. In another, I recorded the color codes from the different needle companies (Schmetz & Singer for me). My thought was that I am too old to try to read all those tiny, almost non-existent, numbers on the needles. Also, what if I forget what type is in the machine…colors!! This picture shows the more detailed version and a hybrid version of simple & detailed. You can see the simple version in the photo of the next step

5.       If looking to tie your NeedleCase…Make a small mark on the left & right sides 5” down from the top. This is for ribbon placement. Pin your ribbon pieces just below these marks.
If looking to loop your ribbon over a button….only add one piece of ribbon on the right.
NOTE: When pinning the ribbon make sure the pin heads are facing out. Also, coil up your ribbon & pin in the middle of the white square so as to keep it out of the seam allowance in the next step.


6.       Lay your square of printed fabric on top of the completed white square, with the ribbon pinned to it, right sides together. Pin this in place.

7.       Stitch all the way around the printed fabric square using a ½” seam allowance, leaving a 4”-5” opening on the bottom (my opening is marked with double pins in above photo). Be sure to back stitch at the beginning and ending of your stitching.
8.        Trim corners and trim batting out of the seam allowance. This trimming will reduce bulk in the next step.
9.       Turn right sides out and poke corners to get crisp corners. Press carefully, turning in the opening ½”.
10.   Top stitch ¼” from edge (this will close the opening).

11.   If you decided to use one ribbon instead of two in step 5, fold the NeedleCase in half (as if closing it) and sew a button on the printed fabric side (opposite the ribbon edge) half way across. This picture might make more sense…

12.   Trim any threads & cut “V” in ribbon, if desired. Fold in half to tie shut!

Tutorial for the Printed Version:
Material:

 1 sheet of fabric you can print on (I used Printed Treasures but fabric on freezer paper works too)
10” square print fabric of choice
QiTG NeedleCase 2.0 grid document
10” square batting (any kind)
10” square stabilizer (tear away) OPTIONAL
(2) 12” pieces ribbon or (1) 12” piece ribbon & 1 large shank button
Thread of choice

Instructions:

1.       Print your grid on your fabric sheet (the needle diagram on the google doc will center itself when you download - weird). Here is a tutorial for preparing fabric for printing using freezer paper.

2.       Lay your printed white fabric square on your batting.
3.       OPTIONAL: Stitch on all the above printed lines – through a stabilizer & fabric. Be sure to use a thread color that is visible against the white fabric but that blends with the print lines. I opted not to sew on my printed version.
4.       If looking to tie your NeedleCase…Make a small mark on the left & right sides 5” down from the top line of your printed fabric. This is for ribbon placement. Pin your ribbon pieces just below these marks.
If looking to loop your ribbon over a button….only add one piece of ribbon on the right.
NOTE: When pinning the ribbon make sure the pin heads are facing out. Also, coil up your ribbon & pin in the middle of the white square so as to keep it out of the seam allowance in the next step.

5.       Layer everything in this order: batting, backing (printed fabric) right side up, printed fabric right side down (essentially right sides together). Here is what is important here….you need to be able to see the grid for the next step.
6.       Stitch all the way around the printed fabric square using on the outside lines, leaving a 4”-5” opening on the bottom. Seam allowance is not a consideration here. Be sure to backstitch at the beginning and ending of your stitching.

7.        Trim ¼” from the stitched lines all the way around, corners and batting out of the seam allowance. This trimming will reduce bulk in the next step.
8.       Turn right sides out and poke corners to get crisp corners. Press carefully, turning in the opening to close.
9.       Top stitch 1/8” from edge (this will close the opening).
10.   If you decided to use one ribbon instead of two in step 5, fold the NeedleCase in half (as if closing it) and sew a button on the printed fabric side (opposite the ribbon edge) half way across. This picture might make more sense…

11.   Trim any threads & cut “V” in ribbon, if desired. Fold in half to tie shut!


I made one of these for the first time several months ago and I have been using it quite faithfully. I had to re-make these for tutorial-writing purposes also because I forgot to add ribbon in the original version. Here is a QiTG NeedleCase 1.0 I use (that is until now)...


I think I might transfer my needles over to the version I made with the printed error. The other three I made will be given away next week on my blog (hint: jump over and follow my blog to avoid missing the giveaway). 

If you make a QiTG NeedleCase 2.0, please share it with me. You can email me or add pics to the QiTG Flickr Group

And thank you Rhonda!

Don't forget to link up your Q2 finishes - the Q2 post-quarter link is open and it will close at midnight MST, July 7, 2013. And if you still have some UFOs I hope you will join us for Q3 of the FAL, Q3 FAL lists can be posted starting on July 8.